Intensifying Saturation
Intensifying saturation in an image is essentially the opposite of a Rescuing it. The purpose of Intensifying is to increase the saturation of unsaturated colors. To do this, the Vibrance mask is used and saturation is increased in the Hue/Saturation dialog box.
A recent image from a slot canyon provides a good example. Figure 21 shows the starting point for this image after conversion of the RAW file.
Figure 21

|
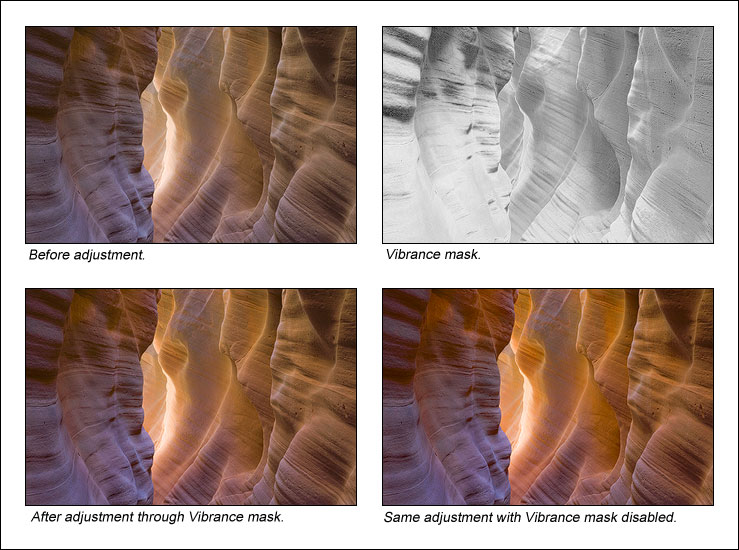
My first task was to lighten the image and improve the contrast a bit. After doing this, the saturation had waned and was definitely lacking as seen in the upper left image in Figure 22. While all the colors actually seemed a little drab, I knew that if the unsaturated colors were targeted for a saturation increase with the Vibrance mask, some of the more saturated colors would be pulled up a little too. The net effect would be a nice boost in saturation throughout the image. Here's the process for using the Vibrance mask.
- Create the Vibrance mask.
- Load it as a selection.
- Create a Hue/Saturation layer with a Vibrance layer mask.
- Adjust the saturation in the Hue/Saturation Master channel to a higher number, in this case +40.
- Click "OK" to accept the adjustment and close the dialog box.
Figure 22 shows the image before and after the adjustment and the Vibrance mask used in conjunction with the Hue/Saturation command. The mask is actually quite light overall, which indicates that there is a lot of unsaturated color in the image, so it's not surprising that a hefty increase in saturation (+40) is needed to effect the desired change. Additionally, the grayness of the Vibrance mask filters the adjustment so it's not full-bore across the entire frame.
Figure 22
|
The lower right image in Figure 22 shows what this same adjustment looks like when the Vibrance mask is disabled. Some of the more unsaturated colors, like the muted blues, are very close to those in the image with the mask in place, but the saturated colors, like the oranges, are clearly oversaturated. Even though the Vibrance mask seems quite light nearly everywhere, it still has the right distribution of gray tones to properly hold the saturated colors in check while the unsaturated colors are enhanced.
Like the Rescue example, this is another case where a quick change to saturation in the Master channel—an increase in this case—made the difference needed to move forward with the image. To be easy and effective, however, the saturation adjustment needed to be filtered through the Vibrance mask to control which colors were affected. The Vibrance mask is an incredibly powerful tool to specifically add saturation to the colors that are under-saturated in an image. It's nearly impossible to target these colors using the Hue/Saturation adjustment alone. Unsaturated colors are a mixture of many different shades, and without the mask, the Hue/Saturation command would oversaturate the purer shades of color before the unsaturated colors are adequately boosted, as is seen in the image with the mask disabled. With the Vibrance mask in place, however, the saturated colors are shielded so that the saturation adjustment is able to reach the unsaturated colors and enhance them before the saturated colors go too far. This type of adjustment can dramatically improve the overall richness of color in an image.