Using the Photoshop Actions
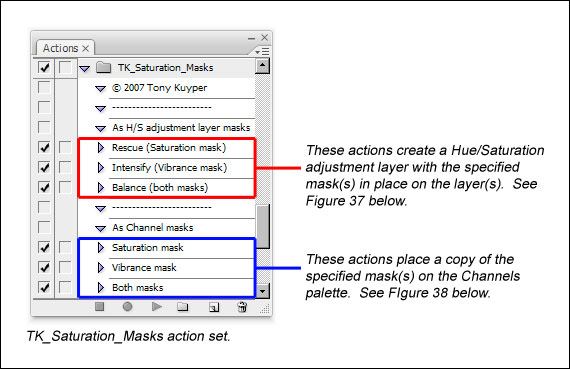
The "TK_Saturation_Mask" action set contains six different actions in two groups of three actions each (Figure 36). The first set, highlighted in red, creates a Hue/Saturation adjustment layer on the Layers palette with the specified mask in place and the layer named to match the mask. The second set, highlighted in blue, creates an alpha channel of the specified mask on the Channels palette. Examples of what these actions do are provided below.
Figure 36
|
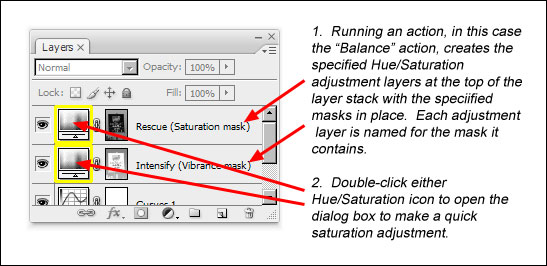
Figure 37 shows the results of running one of the actions that create Hue/Saturation adjustment layers (marked in red above). The new adjustment layers (there are two when the "Balance" action is run) are created at the top of the layer stack in the Layers palette and the layers are named for the masks they contain. After the action has finished running, simply double-click the Hue/Saturation icon on the layer to bring up the dialog box and make the adjustment. The actions take care of all the steps needed to create both the mask and the Hue/Saturation adjustment layer, including putting the adjustment layer at the top of the layer stack and properly naming it. These actions make saturation adjustments to your image very quick and easy.
Figure 37
|
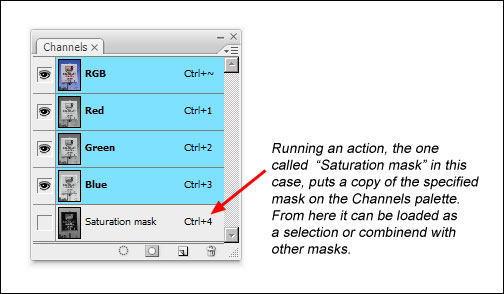
Figure 38 shows the results of running one of the actions that puts a copy of the specified saturation mask on the Channels palette (framed in blue in Figure 36). These Channel masks are useful for those times that you want to combine saturation masks with other selections. You can load the saturation mask as a selection from the Channels palette and then add, subtract, intersect, or perform calculations on the selection to target a saturation adjustment to a more specific part of your image. These actions will probably be used less than those that create the Hue/Saturation adjustment layers, but they're included to allow flexibility to experiment with the masks.
Figure 38
|
The masks can be created at anytime during your work flow, and it's best to generate a new one each time you want to make a saturation adjustment. As you develop an image, the saturation level of the pixels will naturally change. The actions make it easy to create a "fresh" mask whenever you need it and doing so insures that the mask is properly reflecting the image's saturation at that point in your workflow.
Thank you for your donation for this tutorial and the Photoshop actions. I would enjoy hearing how the masks and the actions are working for you and would be glad to answer any questions you may have. Please feel free to with your comments, suggestions, and questions.