Cloud Sharpening
©2010 Tony Kuyper
Clouds are frequently a primary element in a nature photograph and sometimes the reason the picture was taken. Their shape, color, and texture can often add significant drama to a scene. Sometimes, however, the beautiful clouds can be a frustrating element to manage in the final image. They seem to lack detail and sharpness both in the captured image and in the final output. Lack of depth-of-field relative to closer elements in the scene and the normal motion of clouds can contribute to this softness. Clouds naturally look soft, so sharpening them by adding a harder edge and enhancing finer elements might seem unnecessary when a "natural" look is desired. However, subtly improving cloud texture often makes the clouds more attractive in the final rendition. It enhances the viewer's perception of the clouds' importance in the composition and makes the clouds fit in better with other parts of the scene that appear perfectly sharp.
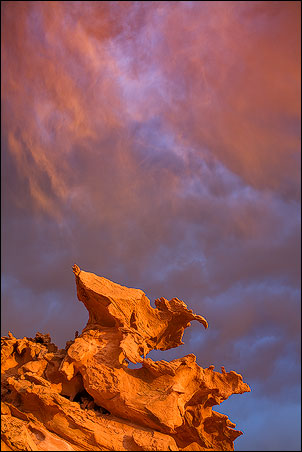
Figure 1 is a scene that had some interesting clouds. The bird-like rock in the foreground sharpened nicely in both the 12x18 print and the jpg image destined for Internet viewing. Relative to the sharpness of the foreground element, though, the clouds look soft. Cloud sharpening is a way to better match the sharpness of the clouds to that of the rocks. It adds apparent depth to the scene since the image now has more equal sharpness front to back. Roll over the image to see how gently sharpening the clouds improves the overall look of the image. The rollover change is subtle, so look carefully paying close attention to the clouds.
Figure 1
|
The cloud sharpening was accomplished using a couple of filters in Photoshop. The steps are described below. At the bottom of this page is a downloadable Photoshop action set that performs the steps to create the sharpened clouds.
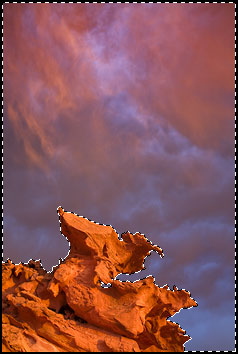
Make a selection of the clouds and sky area to be sharpened and save it on the Channels palette. Use the magic wand, lasso, or other selection tool to select the areas of clouds to be sharpened (Figure 2). This doesn't have to be an exact selection because it will be altered somewhat later, but make it reasonably good.
Figure 2
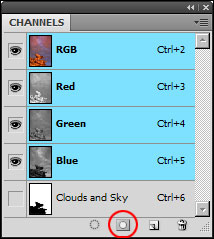
Once the selection is made, save it on the Channels palette using the Save-selection-as-a-channel button at the bottom of the channels palette (red circle, Figure 3). After saving the channel, double click the name of the channel and change it to "Clouds and Sky."
Figure 3
The selection can also be saved using the menu command Select>Save Selection and the name "Clouds and Sky" can be entered in the dialog box.
-
Create a new layer with the current contents of the edited image at the top of the layer stack. This is done using the keyboard shortcut Shift-Alt-Ctrl+E on the PC and Shift-Opt-Cmd+E on the Mac. If the layer is not at the top of the layer stack, drag and drop it there. When finished, the new layer should appear at the top of the layer stack (Figure 4).
Figure 4

-
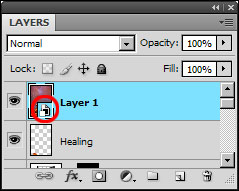
Convert the new layer to a smart object. Right-click the new layer and choose Convert to Smart Object from the pop-up menu (Figure 5).
Figure 5
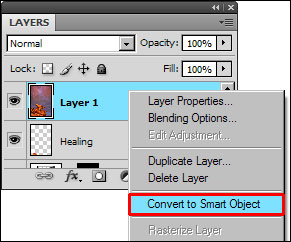
This can also be done using the menu command Layer>Smart Objects>Convert to Smart Object. When finished, the thumbnail image on the Layers palette should show the smart object symbol in the lower right corner (Figure 6).
Figure 6
-
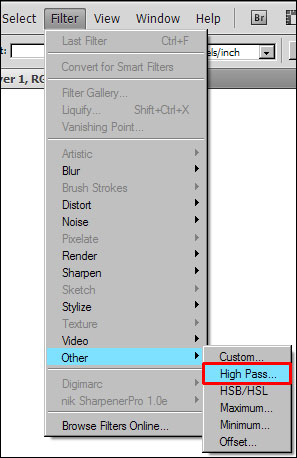
Run the High Pass filter at a radius of 20.0 pixels. From the drop down menu choose Filter>Other>High Pass (Figure 7). The High Pass filter finds edges with color transition such as between clouds and sky or the textures within the clouds. This will eventually create the increased sharpness in the clouds.
Figure 7
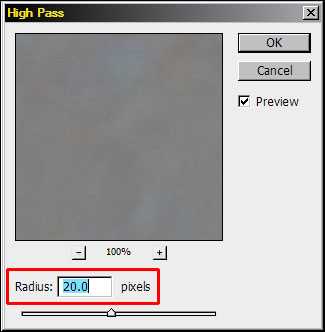
In the dialog window enter 20.0 pixels (Figure 8). The value of 20.0 pixels works well for a 12 megapixel camera. It sharpens the edges of clouds quite nicely but doesn’t produce an obvious halo around the edges when the process is finished. Depending on the size of the camera's image sensor and degree of cloud sharpening desired, the value entered in the dialog box could change slightly. Values as low as 5 and as high as 30 may be useful. Because this High Pass sharpening is being done on a smart object layer, it can be changed later (see Step 8.)
Figure 8
-
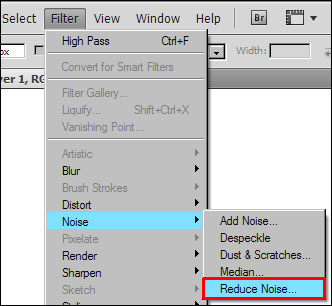
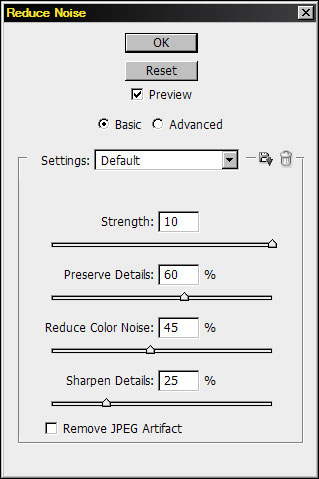
Reduce noise. The High Pass sharpening in Step 4 not only adds sharpness and increases details in the clouds, but it also introduces some artifacts that make the clouds look grainy. To remove this, run the Reduce Noise filter by choosing Filter>Noise>Reduce Noise from the menu bar (Figure 9).
Figure 9
In the dialog box that appears set Strength=10, Preserve Details=60%, Reduce Color Noise=45% and Sharpen Details=25% (Figure 10). This removes most of the graininess introduced by the High Pass filter.
Figure 10
-
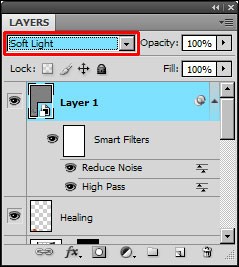
Change the blending mode of the smart object layer to Soft Light. In Normal blending mode, an image after High Pass filtering looks very gray. Click the drop down menu at the top of the Layers palette and select Soft Light (Figure 11). Changing the blending mode to Soft Light returns the image to its normal appearance but with the High Pass sharpening applied.
Figure 11
-
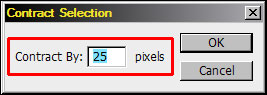
Mask off the areas that don't need to be sharpened. At this point the entire image has been sharpened, not just the clouds. It's necessary to restrict the sharpening to just the clouds because in non-clouds areas of the image, the sharpening may not be appropriate. In order to sharpen just the clouds, make a layer mask that only reveals the clouds. To do this, first load the selection of the Clouds and Sky saved on the Channels palette in Step 1. To load the mask as a selection on a PC, Ctrl+click on the thumbnail image of the mask on the Channels palette. On a Mac: Cmd+click on the mask thumbnail image. Next, contract the selection by using the menu command Select>Modify>Contract. The number entered in the dialog box should be 5 PLUS the number of pixels used for the High Pass filter. In this case that would be 5+20=25 (Figure 12).
Figure 12
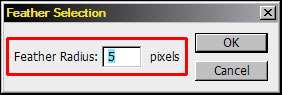
Now feather the selection using the menu command Select>Modify>Feather and enter the number 5 (Figure 13).
Figure 13
To create a layer mask of this modified selection, click the Add-layer-mask button at the bottom of the Layers palette (red circle, Figure 14). (The menu command Layer>Layer Mask>Reveal All can also be used to do this.) A mask should appear on the smart object layer that is white in the area of the clouds and sky (red square, Figure 14). Where the mask is white, the cloud sharpening is revealed, and where it is black, the sharpening is masked off so that it is concealed from view.
Figure 14

-
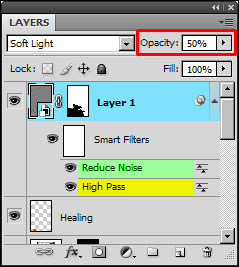
Make adjustments to fine-tune the degree of cloud sharpening. There are several ways to adjust the sharpness of the clouds once the sharpening and masking procedures are finished. If the cloud sharpening is too strong, the easiest solution is to reduce the opacity of the smart object layer (red rectangle, Figure 15). The degree of cloud sharpness can also be adjusted by double-clicking the High Pass section below the smart object layer (yellow highlight, Figure 15) to bring up the High Pass filter dialog box. To increase sharpness, enter a larger pixel value in the dialog box. To decrease sharpness, enter a smaller number. Changing the amount of High Pass sharpening might also require changing the amount of noise reduction. Double-clicking the Reduce Noise section (green highlight, Figure 15) will bring up the dialog box to do this.
Figure 15
-
Make adjustments for final output sharpening. Sharpening the clouds using this procedure may require changes to output sharpening, which is the final sharpening applied after resizing the image to it final destination size, such as for an inkjet print or for presentation on the Internet. For example, when using my web-sharpening actions (Less Halos or More Contrast) to sharpen a jpg image for the Internet, generally decrease the opacity of the smart object layer to 50% (red rectangle, Figure 15) before running the action. If the clouds are too sharp in the jpg, then start over with an even lower opacity. If not sharp enough, increase the opacity.
When making an actual hard copy of the image on a printer, apply your normal output sharpening sequence for prints to a duplicate of the background layer. If the clouds look too sharp afterwards, use a layer mask on the sharpened layer to conceal the over-sharpened areas. The Clouds and Sky selection saved on the Channels palette in Step 1 can again be useful for this purpose. Some options for using it include:
- Create a Reveal All layer mask (Layer>Layer Mask>Reveal All) on the sharpened layer. Then with the layer mask active, load and fill the selection of the Clouds and Sky with 50% gray (Edit>Fill>50% Gray) or some percentage of black to pull back the output sharpening of the clouds on the sharpened layer to the desired level.
- Create a Reveal All layer mask on the sharpened layer. With the layer mask active, load and fill the Clouds and Sky selection with 100% black (Edit>Fill>Black-100%). This totally removes the output sharpening from the Clouds and Sky area. Now intersect the Clouds and Sky selection with an Edge Mask selection (included in the action set, see below). With this new selection active, fill the layer mask with 100% white (Edit>Fill>White-100%). This adds white on the black areas of the layer mask in the areas of the active selection--the edges--to reveal just the edges and textures of the clouds. Repeat the Edit>Fill maneuver until the desired degree of cloud sharpness is achieved. (This is my favorite method for managing the final cloud sharpness in prints. The edge mask does a good job of revealing sharpness in the clouds exactly where it's most desired with very little increase in sky graininess. And, because the Edit>Fill command generally needs to be repeated several times, cloud sharpness is revealed in a slow, progressive manner allowing a high degree of control as to how much output sharpening gets added to the clouds.)
- Create a Reveal All layer mask on the sharpened layer. Load and fill the Clouds and Sky selection with 100% black (Edit>Fill>Black -100%) to remove all output sharpening from this area of the image. Paint white on the layer mask with a low-opacity brush until the desired level of cloud sharpness from output sharpening is restored.
The cloud sharpening sequence described here can subtly, but significantly, improve the visual appeal of clouds in an image by creating more prominent edges and enhancing texture. It works specifically on clouds and needs to be restricted by a mask to the "cloudy" parts of the image. Occasionally additional output sharpening will slightly over-sharpen the clouds, but this is generally easy to manage by using a layer mask on the sharpened layer to conceal the excess sharpening.
Below is another image where cloud sharpening was applied. Again, roll the mouse over the image to see the subtle improvement in the clouds that results.
Figure 16

|
A PDF version of this tutorial along with an action set are included in the Special Offer . The action set has two actions. The TK-Cloud Sharpen action creates the smart object layer and performs the high pass filtration and noise reduction. You'll still have to add the mask to restrict the sharpening to the clouds. The second action creates an edge mask to use in fine-tuning the final print if desired.