TK9 Plugin for Adobe Photoshop
The TK9 plugin is the latest release (July 2023) of my comprehensive panel for making pixel-value masks, like luminosity masks, and running Photoshop. Like its predecessors, it's modular, so users can configure it in whatever manner works best in their workspace. The plugin is used worldwide and comes pre-programmed with six common languages: English, Spanish, German, French, Italian, and Chinese. Users can choose the language they prefer. TK9 works equally well on Windows and Mac computers, including computers running Apple silicon processors, like the Mac M1 or M2. Installation is easy and the same installers work on Mac and Windows.
Additional resources:
- My blog has more information on using this plugin and is updated regularly. Be sure to subscribe to get the latest updates.
- Sean Bagshaw's YouTube channel has a playlist of TK Quick Tips that covers several different versions of the TK panel.
- Dave Kelly's YouTube channel has an ever-expanding playlist of videos using the latest TK plugin for Photoshop.
- Italian customers should check out Nico Ruffato's YouTube channel for a variety of videos covering TK9 features and techniques for using them.
- The free Getting Started with TK9 mini-series on the Panels & Videos page has several videos that provide a nice overview of the TK9 modules.
- The TK9 Button By Button Guide also on the Panels & Videos page is the ultimate resource for everything about the different TK9 modules.
- There are several videos on this page that also provide additional details about TK9.
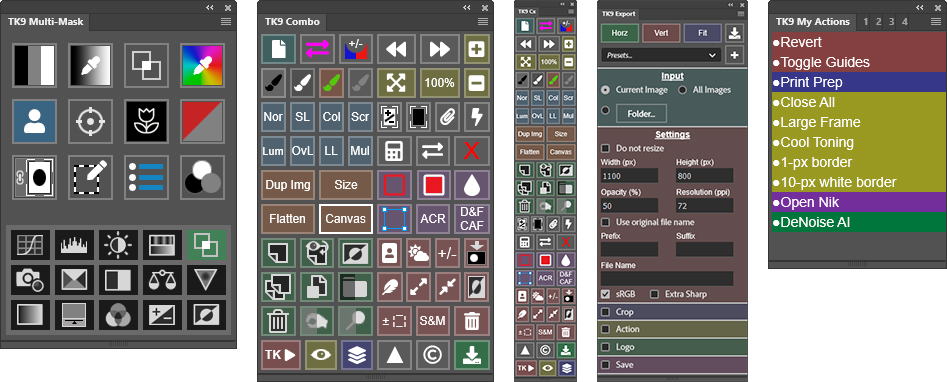
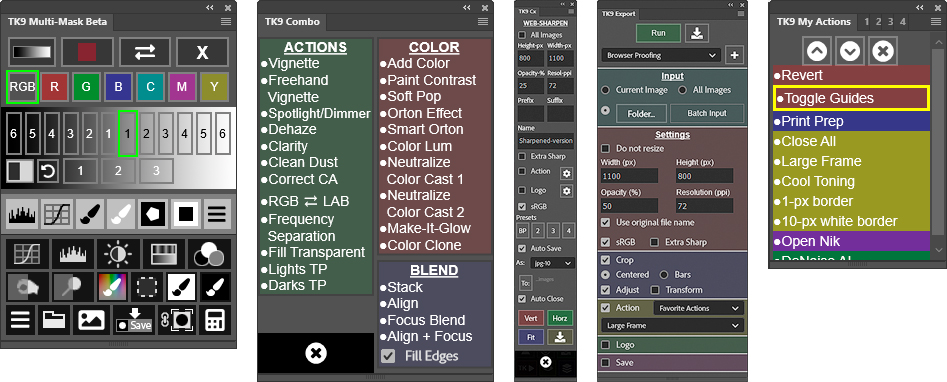
The TK9 plugin is compact and loaded with functionality. In addition to the main interface, there are logical submenus that can be easily accessed using the buttons on the main interface, and these submenus automatically close when they are no longer needed. Rolling the mouse over the image below displays more of the underlying menus available in these modules.
The main feature of the TK9 is its ability to make pixel-value masks, like luminosity masks, with the Multi-Mask module. But luminosity masks are just the beginning. TK9 also makes masks based on color channels, luminosity zones, hue, color, Blend If settings, saturation, vibrance, and the user's own alpha channels. Edge masks and focus masks are also easy to make with TK9.
Beyond making specialized masks, TK9 offers several other modules to spark creativity and enhance productivity in Photoshop.
- The Combo and Cx modules run many common Photoshop functions without using menus or keyboard shortcuts. These modules also have actions for quickly adding special effects to an image and sharpening images for display on the internet.
- The My Actions modules allow for the creation of customized action lists for routine or specialized workflows.
- The new Export modules prepare one image or an entire folder of images for web presentation. It can sharpen, rename, crop, run actions, apply watermarks, and save images with a single click.
The video below reviews some of the newest features. Scroll down to see a more complete list of features.
The TK9 plugin uses Adobe's UXP architecture and is designed exclusively for Photoshop. Photoshop 2022 version 23.2.0 or higher is required to install it, but Photoshop 2023 version 24.6.0 is needed to run the color grading function in the Multi-Mask module. Because TK9 is built to Adobe's specifications, it should work in future versions of Photoshop as well, but it will not install or work in older versions. Below are some of the features of each module.
Multi-Mask
- Multiple sources/multiple masks−TK9 is much more than just a luminosity mask plugin. Channel, zone, color, saturation, vibrance, Blend If, edge, and focus masks are created just as easily as luminosity masks. From these sources, entire spectrums of 16-bit, pixel-based, self-feathering masks can be generated.
- Organized workflow-The user interface provides a clear, stepwise process for making masks. Choose the SOURCE, make the MASK, MODIFY it, and OUTPUT it.
- Numerous output options−Adjustment layers with layer masks, burning and dodging, creating selections, mask painting, filter masks, and pixel layers from masks all with one click.
- Accented button mask interface−The current mask button (Lights-1, Lights-2, Darks-1, Midtones-2, etc) is always highlighted in order to keep track of the current mask in order to help decide what to try next.
- Add and subtract masks with ease−The mask calculator provides an easy way to add, subtract, or intersect any mask created by the panel.
- Blend If masks−Visualize Blend If settings as a mask and then output as a layer mask, a selection, or Blend If settings.
- Edit Blend If−Add or edit Blend If settings to any layer directly from the module. Adjust Gray channel and Color Channels to control layer blending. A color overlay provides visual feedback as to which parts of the image are being affected.
- Color grade using a color wheel−Color grade with a Curves adjustment layer using the module's color-wheel interface to control the adjustment. Save, reload, and compare color grading presets with ease.
- Layer Mask mode−Switch and adjust layer masks while watching the image to find the best mask for a particular adjustment.
- Edit an active selection as a mask−Easily turn an active selection into a mask, modify it, and then continue using it as a selection.
- Fine-tune the look of an image−The Workflow Extras section has actions for adding subtle effects.
- Create a Depth Map−And use it to choose a focus point for the image or to add bokeh.
- Make color and black and white sketches−Turn any image into a sketch with sketch actions from Steve Dell.
- Guided Frequency Separation−Use specific buttons to easily control the tools and layers for retouching color and texture.
- One-click adjustment layers−Fourteen (14) of the most common adjustment layers can be added directly from the main interface.
Combo/Cx
- Compact design−Combines Photoshop control, web-sharpening, watermarking, and creative actions into one module.
- Run Photoshop from the module−Many common Photoshop functions, keyboard shortcuts, and menu items can be run with a single button click from the module.
- Muted color interface−Buttons are separated into logical groups in order to quickly find the correct Photoshop function. Button color saturation can be adjusted in the module's preferences.
- Layer mask calculator−Add, subtract, or intersect saved channel masks with a layer mask and create an updated layer mask in the process.
- Multi-function buttons−Some buttons have dual functions that are graphically displayed on the button itself or that can be activated with the CTRL/command key.
- Use the "TK ▶" button to access creative Photoshop actions−A menu of practical and creative actions is available for speeding the Photoshop workflow and experimenting with different techniques.
- Exposure blending actions−Stack, Align, and Focus Blend are found in the "TK ▶" menu.
- Integrated web-sharpening−A n web-sharpening interface offers presets, file-naming, and file-saving for web-sharpened images.
- Watermarking−Add your personal logo to any image. Customization options include position, size, edge offset, and opacity.
- Programmable buttons−Fourteen (14) buttons can be reprogrammed with the user's actions so that buttons that aren't being used can be given a new purpose.
- Right-click color-tagging−Right-clicking on buttons, menu items, and user actions provide enhanced color options in order to quickly find your favorites.
- New Before-and-After button−Provides a quick way to assess the progress made when developing the image.
- New Color Overlay button−Quickly see what is being revealed on the layer through the layer mask or Blend If settings.
My Actions
- Create custom lists of your most frequently used Photoshop actions−Add personal actions from any action set on Photoshop's Actions panel.
- Multiple tabs−Provides the option for making multiple lists to address specific workflows.
- Dynamically organize the list to meet your needs−Move actions higher or lower in the list, highlight them with a colored background, and add and remove actions from the list with ease.
- Create your own plugin−Keyboard shortcuts, Photoshop menu items, and Photoshop scripts can also be added to this module as long as they are embedded in a Photoshop action. This makes it possible to create a panel that contains all the frequently used functions in your Photoshop workflow.
- Multiple configurations−This module can be docked anywhere in the Photoshop workspace. I can also be resized to the narrow width of the Cx module so that it can be contained in the same narrow vertical dock. This way it is always open and ready to use.
Export
- Expanded functionality−The Export module builds on the web-sharpening present in the Combo and Cx modules to offer many more possibilities.
- Prepare images for display on the web−Input one image, multiple open images, or an entire folder of images.
- Unlimited presets−Create an unlimited number of custom presets. Organize, load, update, and delete presets with ease.
- Perfect web-sharpening−Sharpening algorithm uses the image itself to optimize final appearance and can be fine-tuned based on user input.
- Multiple naming option−Add prefix or suffix, give the sharpened image new name, or use the original file name.
- Multiple cropping option−Auto, user-adjusted, centered, add colored bars, add image bars, and even transform the final results.
- Run a post-sharpening action−Easily add frames or layer effects to customize the final presentation.
- Customized watermarking−Choose from different watermarks, pick the right location on the image, even change the watermark's color to suit the image.
- Save sharpened images−Save in a designated folder. Choose from different file formats.
Features on multiple modules
- Active selection indicator−An obvious new edge is added to the modules when there is an active selection even if there are no marching ants visible or they've been hidden.
- Fly-out menu preferences−Use the module's fly-out menu to change language, update module specific settings, and access helpful resources.
- Back up and restore−Easily save user-specific settings in order to recover from a computer crash or to transfer TK9 settings from one computer to another.
- Multiple languages−English, Spanish, German, French, Italian, and Chinese.
- Tooltips−Helpful messages appear at the top or bottom of the module when rolling over the different buttons. Simply hold down the "ALT" key on Windows or the "option" key on Mac to access these tips.
For a more detailed look at the TK9 plugin, download the TK9 Instructions Manual.
Where to Get It
The TK9 plugin is available on the Panels & Videos page.
Sean Bagshaw Videos
Sean Bagshaw is an expert user of luminosity masks. For many years he has helped me improve the panels and plugins and has created numerous videos that teach photographers how to use these techniques. For the TK9 plugin, Sean has put together two video products: a free mini-series called Getting Started with TK9 and a comprehensive series entitled TK9 Button By Button Guide. The videos review how to install the modules, how to set up Photoshop for luminosity masks, what the various buttons and menu items do, how to interact with the different interfaces, and tips and tricks to get the most out of using the TK9 plugin. Sean has a unique ability to explain even complicated things in a manner that makes them understandable to almost everyone, and while the modules really aren't all that complex, Sean shows just how easy it is to use them. Sean's videos are available on the Panels & Videos page. Below are a couple of videos from these series.
I hope you find the TK9 plugin useful in your photography. As always, please feel free to contact me if you have any questions or suggestions.