Luminosity masks map the luminance of each pixel as a grayscale value in the mask. Because they are based on pixel-level data, their tones perfectly match the image and, as a result, are completely self-feathering. Any adjustment through these masks blends seamlessly into the image with no visible edges or borders.
FREE!
Get a Photoshop plugin to make Luminosity Masks
I started my work with luminosity masks in 2006. While the concept of luminosity masks existed since Photoshop started using masks, the process described in this tutorial for creating the different series of masks—Lights, Darks, Midtones—was the breakthrough that allowed their widespread adoption. Once these series are available, the different masks accurately target specific tones in the image making them a precision tool for adjustments and exposure blending. The concepts discussed in this tutorial have since been widely adopted, copied, and promoted throughout the photo community. Almost anyone who now writes or makes videos about luminosity masks still creates series of masks identical to those described here. So, much to my surprise, this tutorial turned out to be ground zero for the luminosity mask explosion that eventually engulfed digital photography. They have become such an integral part of post-processing that Adobe included luminosity masks in Light Room and Adobe Camera Raw starting in 2017.
My own work with pixel-based masks has continued and there is much more information on my blog including the method for making 16-bit luminosity masks. However, I've left this original tutorial pretty much as it was when I posted it in on November 13, 2006. It was actually the first tutorial I ever wrote, and even though the illustrations and layout are now somewhat dated, it still accurately describes the different series of masks that make luminosity masks so effective. I hope you find it useful and will check out my blog and the Panels & Videos page for additional information.
Luminosity Masks
©2006 Tony Kuyper
Introduction
Question: What are luminosity masks?
Answer: Luminosity masks target specific tones in the image during digital development. They are created by taking the luminance value of each pixel and assigning it a specific gray-scale value in the mask. So the basic luminosity mask is simply a gray-scale map of pixel luminance. Once this initial luminosity mask is available, it can be used to calculate a wide variety of different luminosity masks that target light, dark, and midtone values. And because luminosity masks are created from pixel-level data (luminance), they automatically and perfectly match tones in the image. This makes them completely self-feathering so that any adjustments through these masks blend seamlessly into the rest of the image.
Any image can be turned into a luminosity mask, like the one below.
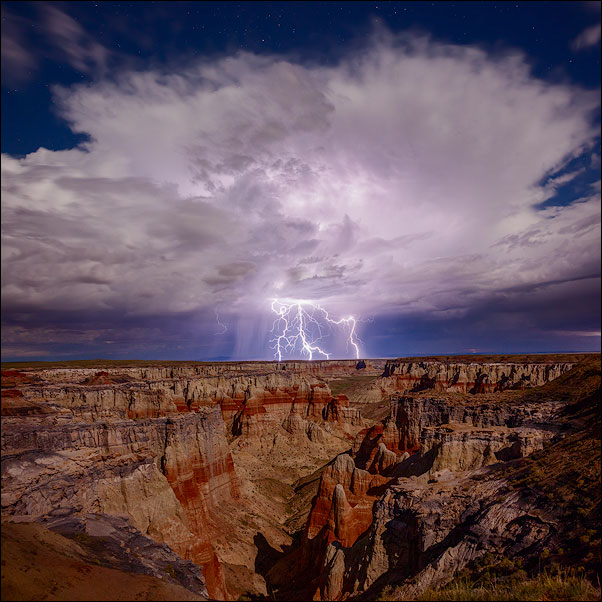
Photoshop very easily calculates the luminance of each pixel and can output that data as a grayscale mask shown below.
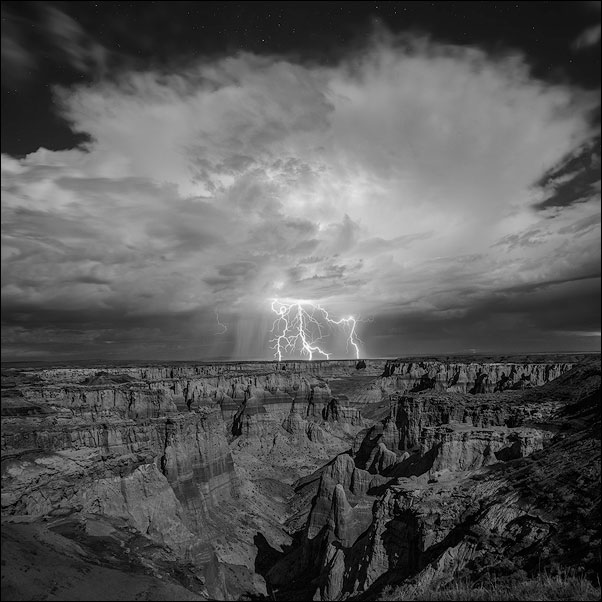
This black and white version is the initial "Lights" luminosity mask for this image. As you can see, the mask is simply a gray-scale version of the image. However, as stated above, these gray-scale tones have been calculated to perfectly match the luminance value of each pixel, which is the fundamental principle underlying all luminosity masks, and this initial mask is only the beginning. This tutorial looks at how a wide range of luminosity masks can be created by starting with just this one mask.
Luminosity masks provide a convenient way to select specific tones in an image, based on pixel luminance, which can then be altered as the user sees fit. They can conveniently help overcome shortcomings in the tonal values that were captured by the camera and to correct tones that shifted during image manipulation. Luminosity masks also encourage a very individual approach to interpreting light. They make the captured light incredibly flexible and thereby provide unique opportunities to use Photoshop to explore a personal vision through photography.
While luminosity masks are created in Photoshop, they aren't available from the drop-down menus and can't be created with tools in Photoshop's Tools palette. This tutorial will describe the masks, how to make them using Photoshop, and the basic way to use them. The two primary masks, "Lights" and "Darks", are relatively easy to create. From there, however, it becomes more complex as the various selections are intersected and subtracted. All the steps will be explained in the tutorial. While it’s important to understand the basics of how to create luminosity masks and the tones they select, mask creation can be a bit cumbersome. So, to efficiently use the masks in a Photoshop workflow, it’s usually best to create a set of Photoshop actions to do all the key strokes. Actions greatly simplify the process of generating the masks; a couple of clicks and you're done. There are free actions and a free panel for making all the masks on the Panels & Videos; however, I would urge you to take the time to gain an understanding of the process by which the masks are created and to actually practice making a few. It will be useful when reading the other tutorials on this website and will allow you to develop a very personal approach to employing the masks, which, in the end, will make your images more distinctive.
Several of the other tutorials on this website are an extension of the concept of tone-based adjustments that the luminosity masks make possible. While this first tutorial will provide the basic concepts, there is a wide range of possibilities beyond what it can cover. The other tutorials will look at additional ways that the masks can be used as well as exploring other techniques for tonal adjustments. Please visit them when you have time. The "tutorials" link in the header of each page will take you to the tutorial table of contents.
Before going too far, I should mention a few things. First is that I work on a Windows-based computer running Photoshop CS when this tutorial was written (2006). The instructions and illustrations in this tutorial are presented with those parameters in mind. Some facility with Photoshop will be assumed. While the details of the processes are explained, I won't attempt to provide definitions of every Photoshop term or how to perform common steps. If you've worked (or played) with Photoshop, you're probably familiar enough with the program to do the necessary steps. Additionally, I use Photoshop shortcut keys in several situations. These are a combination of the SHIFT, CTRL, and/or ALT keys being held down at the same time and, while continuing to hold them down, hitting a letter, number, or symbol on the key board. The ones I list will be the defaults that came programmed into Photoshop at the time this tutorial was written. Mac users will know that "CTRL" on a PC is the same as "command" on a Mac and that "ALT" on a PC is the same as "option" on a Mac. There are usually drop-down menu commands that correspond to the shortcut keys, and these could also be used, though I won't always list them.
To move through the tutorial, there's a table like the one below that links to the various short sections. If you're ready to start, click the entry that says NEXT—The Basic Mask—"Lights" to take your first steps into the wonderful world of luminosity masks.