Jump to camera-specific linear profile downloads.
I started working with linear profiles shortly after a good friend introduced me to them. I needed to practice with a few images, but soon I was consistently achieving better results with my RAW file conversions. Switching to a linear profile is now my first step in editing RAW files. It's become obvious that linear profiles are a powerful creative tool, and the purpose of this article is to encourage other photographers to try them. The first sections discuss basic information about linear profiles and below that are download links to linear profiles for various camera models.
What is a linear profile?
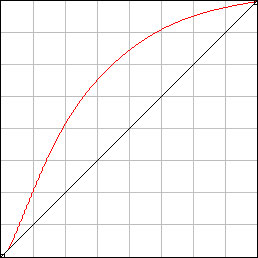 A profile1 is the set of instructions that tells Lightroom (Lr), Adobe Camera Raw (CR), or other RAW processing software how to display the data from a RAW file captured by a digital camera. The conventional profile is non-linear (not a straight line), as shown by the red curve in the attached figure. This bowed profile was selected long ago for practical reasons. Curves with this general shape convert the dull, flat output from a digital camera to a brighter displayed image that more closely resembles how we see things. The red curve in this figure is the Adobe Standard profile. Its shape is typical of commonly used profiles. Note how the red tone curve brightens essentially all pixel values while increasing shadow contrast (steeper curve) and decreasing highlight contrast (less steep curve). The resultant displayed image looks “familiar” with good brightness and contrast. Since the profile is the initial interpretation of the camera RAW data, there are valid reasons to choose one that brings the image to an “attractive" point where the adjustments in Lr/CR can be used to refine the final result. However, a profile does NOT have to be curved. A linear (straight-line) profile, as shown by the black line in the figure, could also be used. If the profile used by the program is linear, the displayed image is typically less vibrant, but (and this is important) it also better represents the actual data in the RAW file. If the conventional profile is considered step one in the processing workflow, then the linear profile is “step zero.” The linear profile allows ALL pixel adjustments to be made entirely by the photographer, whereas, with a curved (nonlinear) profile, the first major step in developing the image is already shaped by the software/camera engineers who designed that profile. The linear profile takes a step back to offer a new level of control for interpreting digital camera data and opens new opportunities in the process. The paragraphs below discuss the positive and negative effects of starting the workflow with a linear profile.
The image looks darker and flatter at the beginning.
The main drawback of the linear profile is that, at least initially, the image looks worse onscreen. It's darker, has less saturated colors, and less contrast. In fact, it appears to be a somewhat poor starting point for making adjustments in Lr/CR compared to using one of the Adobe Raw profiles. However, there are a couple of strategies for working with linear profiles that usually help produce better results than could be obtained with from one of the curved profiles
1. Use the "Auto" button.
The "Auto" button in Lr/CR generally does a very good job of restoring the image to a more "normal" appearance after applying the linear profile. In fact, the "Auto" option with a linear profile often looks better than the "Auto" option combined with one of the stardard Adobe Raw profiles. For linear profiles, the highlights will be full of detail and the shadows won't be excessively contrasty. An Exposure and Contrast adjustment might be all that's needed after using "Auto" with a linear profile. However, the linear profile also makes the image more responsive to many of the sliders in the Basic section of Lr/CR, so take some time to experiment with these to see how they might also improve the image. The sliders HSL/Color section of Lightroom (Color Mixer section of Camera Raw) are also better calibrated when using the linear profile. So, be sure to try these also to fine-tune color balance during the conversion process.
2. Go fully manual.
Even though the linear profile makes the image look flatter at the start, it also opens up new possibilities for manual adjustments in Lr/CR. The linear profile allows working more closely with the RAW file data. Adjustments no longer need to be filtered through a bowed tone curve. As a result, the sliders in Lr/CR are more responsive and predictable. There is often more leeway in what the sliders can do and additional creative control in how the converted RAW file will look. Highlight detail recovery, in particular, is an area where the linear profile excels. Remember how the bowed tone curve lightens and compresses the highlights? This causes highlight textures to get pushed towards white resulting in a loss of fine detail in brighter midtone and highlight values. Switching to a linear profile instantly recovers highlight details, and the user can then make adjustments to better preserve them. Highlights, however, aren't the only tones that can be managed well with a linear profile. Shadows and midtones also respond nicely to manipulation with the Lr/CR sliders. Working completely manually with linear profile ("Auto" not used) generally requires using most of the adjustment options in the Basic tab of Lr/CR. Exposure will need to be increased (since the linear profile doesn't add brightness) and contrast will likely need to be boosted as well. Highlights and Shadows usually need adjustment, but there is often more latitude in these sliders so that you can make the necessary adjustment without maxing out the slider. Whites and Blacks may also need adjustment, but mostly to prevent clipping in the histogram. Vibrance and Saturation should also be addressed. An image with a linear profile often has flatter colors, and adding Vibrance and/or a small amount of Saturation brings them out more. Finally, in terms of color adjustments, the Color Mixer in Camera Raw or the HSL/Color panel in Lightroom is particularly effective at creating the proper color balance. Working completely manually means the image is less-processed from the very start. Freed from the expectations created by the nonlinear tone curve and the "Auto" button, the image can now be more easily adjusted to match the creative intent of the photographer.
3. Combine "Auto" and manual.
That's what I currently do. Immediately after applying the linear profile, I click the "Auto" button. This usually provides a reasonably good starting point. Then I move to the sliders and fine-tune the conversion, taking some time to experiment with most of the sliders in the Basic panel to find the best combination of settings. I also almost always explore the Color Mixer (HSL/Color panel in Lightroom) to work with individual colors to balance hue, saturation, and luminance across the image.
Potential advantages of linear profiles.
Linear profiles are camera-specific.
Each camera model requires a different linear profile. Once installed, Lr/CR will only display a linear profile option if there is an installed linear profile that matches the camera from which the RAW file was originally produced. Linear profiles for a variety of different camera models can be downloaded at the bottom of this page.
Additional information about linear profiles.
1As described in various sources, a profile contains both tone and color information. For this article, the discussion focuses only on the tone curve portion of the profile.
2The process described in Trent’s article was used to generate the linear profiles linked below.
To get the linear profile for your camera, follow the directions below. Multiple profiles can be added to the shopping cart. All linear profiles are free.
NOTE: If you don't see your camera listed, please contact me to make arrangements to have it added.
