Cloning Color, Retaining Texture
©2008 Tony Kuyper
Photoshop provides many tools for "cloning," the process of cleaning up small imperfections before printing. Dust on the sensor, contrails in the sky, twigs protruding into the frame, or a cigarette butt in the scene are examples of things the photographer might choose to clone out. Several tools are provided in Photoshop to make easy work of these situations. The Rubber Stamp tool, the Patch tool, the Healing Brush and the Spot Healing Brush are the usual choices.
These tools do a great job of changing pixels in an attempt to match the surrounding area so that the spot is no longer visible, but they also tend to change the texture of the area. While this can be mitigated somewhat by choosing the right area to sample with the Rubber Stamp, Patch, and Healing Brush tools, sometimes keeping the underlying texture intact and changing only the color is what would actually work best, especially if the area is larger than a few pixels. There is no specific tool to do this in Photoshop, but it can be accomplished in a relatively simple manner with only a blank layer and the Brush tool.
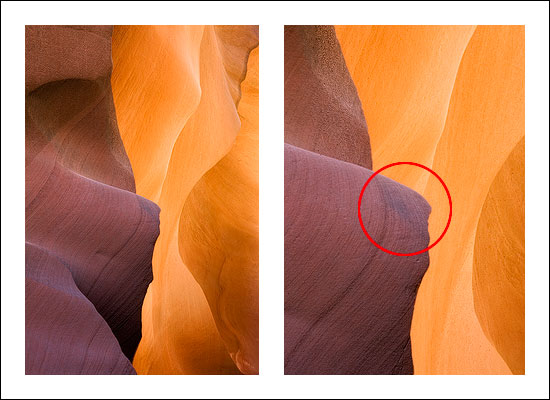
Below is an image and a close-up section where a pivotal area (circled in red in the close-up) had just enough color difference to slow the eye down as it prepared to jump off into other parts of the scene. The texture of the area was perfect, but the color wasn't quite right.
To correct it, the Patch or Healing Brush tool could have been tried, but because they create their replacement color from adjacent pixels, the edge shared with the background area would bleed orange into the correction. The figure below shows the results of attempting to use the Patch tool. The orange color and the less than perfect edges are obvious. The texture has also been changed but might be passable.
A better way to facilitate the color change is by adding the right color in a new layer over the texture that is already present. The Brush tool is used to do this. Because the Brush tool can be finely controlled, even with a computer mouse, blending the correction into scene is both easy and accurate.
Before describing the procedure, however, it's important to set up Photoshop to make the process work correctly. First select the Eye Dropper tool from the Tools palette.
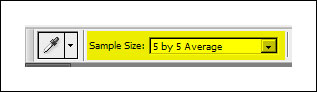
Then go to the Options Bar at the top and select a sample size of "5 by 5 Average" from the drop-down menu. This insures that when color is sampled it will be representative of an area and less likely to be influenced by the color of any one pixel.
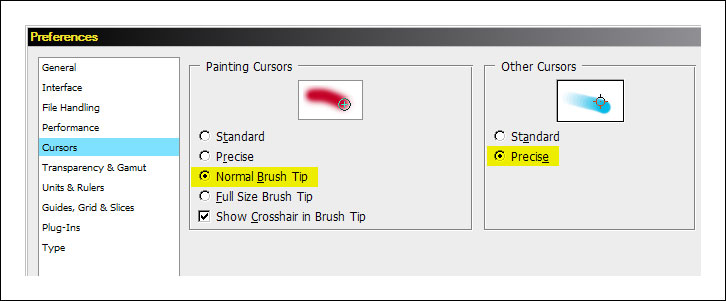
Also, if you haven't already done so, make sure your painting cursor is set to "Normal Brush Tip" and your other cursors are set to "Precise." These preferences can be found under Edit > Preferences > Cursors.
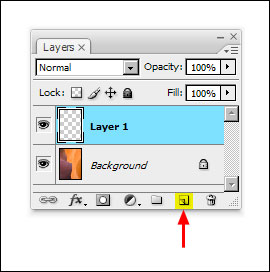
The first step in the painting process is to make a new layer by clicking the "Create a new layer" button at the bottom of the Layers palette. A new, blank layer will appear (Layer 1, in this case) above the active layer in the Layers palette. Generally this layer should be the topmost layer, so if there are multiple layers in the Layers palette, drag the new layer to the top.
A new layer can also be created with the menu commands Layer > New > Layer and then clicking "OK" in the default from the dialog box that opens.
Once the layer is created, go to the top of the Layers palette and change the blending mode from "Normal" to "Color" in the drop-down menu.
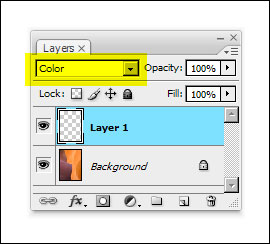
According to the Photoshop, the "Color" blending mode "creates a resulting color with the luminance of the base color and the hue and saturation of the blend color."
With this procedure, the gray tones that define the texture in the image (the luminance of the base layer) will remain unchanged, but the color will match what is placed into this new layer. Right now this new layer is empty, so there is no color change evident in the image. The way to get the right matching color for the discolored area is to sample it from the surrounding area, and then paint it on over the area where color change is desired.
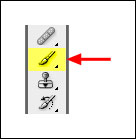
In order to paint, click the Brush tool in the Tools palette.
Again go to the Options Bar to properly set the Brush tool properties to facilitate the process. Click the drop down menu for "Brush:" then set the "Master Diameter" to make an appropriately sized brush for painting over the area that needs it. In this case, I started with a 75-pixel brush. Remember, once you close this dialog, you can easily adjust brush size on the fly using the right bracket key ( ] ) to make it larger and the left bracket key ( [ ) to make it smaller. Also, move the slider for "Hardness:" to zero so that the brush will have soft edges to facilitate blending. The yellow highlights in the figure below show these adjustments.
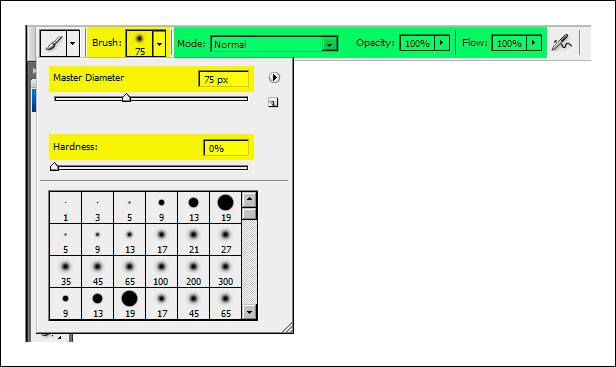
The green highlights in the figure above show other important settings on the Options Bar for the Brush tool. The "Mode:" should be "Normal" and the "Opacity:" should be low; 10% to 15% is usually a good starting point. The low "Opacity:" setting means that color can be added incrementally with each pass of the brush over the affected area. This allows the color change to occur more slowly and also permits re-sampling to produce natural color variation. Finally, to avoid confusion, the "Flow:" value should be at 100%. This insures that each time you click the mouse and pass it over the area to be retouched, the brush will lay down 100% of the selected opacity percentage of the sampled color. This avoids unintentionally laying down additional color with subsequent passes while the mouse is clicked.
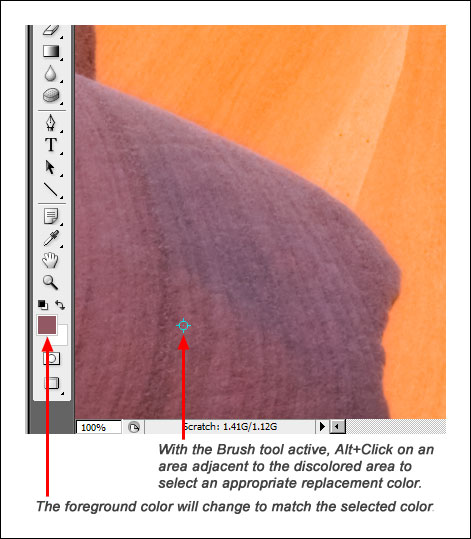
Now it's time to paint. Make sure the blank new layer is the active layer and zoom in on the area that needs to be corrected. To sample a color for painting, press the ALT key (option key on a Mac) and click and release on a color that best matches what the discolored area should look like. In this image, the rock adjacent to the discolored area was sampled. The "Set foreground color" area of the Tools palette will show the sampled color .
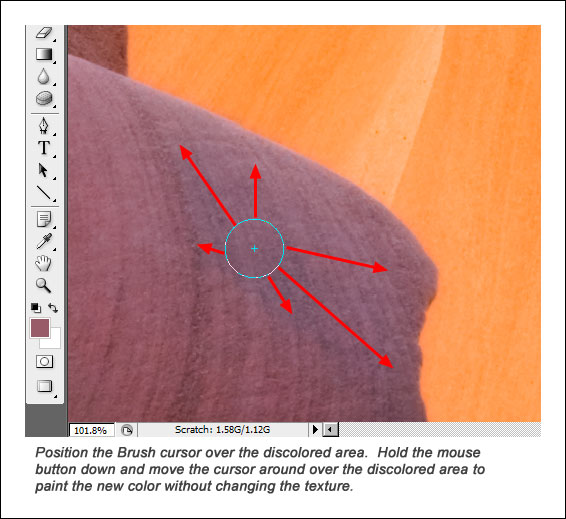
To paint, place the Brush curser over the discolored area. Click the mouse, hold the button down, and move it around the area to paint the color into the new layer. It's important to continue to depress the mouse button until you've made one pass over all the places you want to cover. If you un-click the mouse, painting stops. After doing this the first time, a very slight color change should be noticeable in the discolored area.
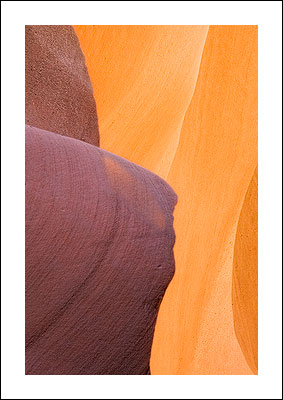
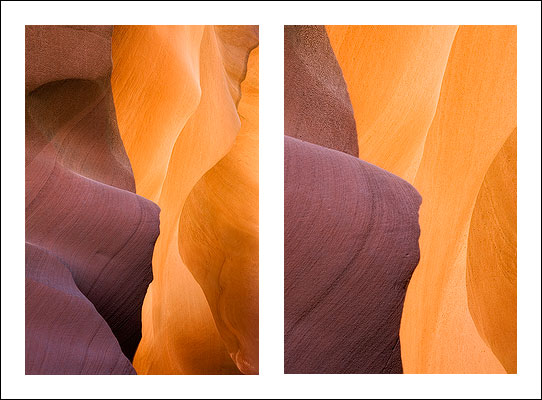
Sample another adjacent color and again paint over the discolored area. This color will be slightly different than the first color, so it will add a little variation to the discolored area. Make the brush smaller ( [ ) to work in the edge areas. Continue to repeat this cycle of sampling and painting, slightly changing the area that is painted each time to create additional variation. When finished, the texture of the discolored area will be unchanged but the color will blend much better with the surrounding area. By using colors sampled from different locations and varying the brush's size to stay within the edges, it's usually possible to achieve a color change that is a perfect, natural match to the surrounding area. The image below shows the image and a close-up of the formerly discolored area after painting in the right amount of color. Roll the mouse image to see the original versions.
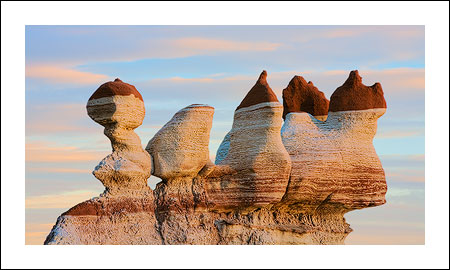
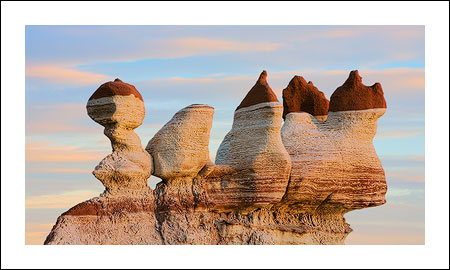
While this technique works great on images with small discolored areas, it works equally well on areas of larger discoloration. The image below is an example. The rock formation looks nice against the high clouds in the sky, but the amount of blue in the shadows on the rocks is too intense. It would be nearly impossible to Clone, Patch, or Rubber Stamp these areas back to normal. Painting color from the surrounding areas into the blue shadows, however, makes it quite easy and very natural looking. The key is to paint the color into a blank layer in which the blending mode had been changed to "Color" so that natural texture of the area is preserved. The mouse rollover shows the results after painting in a warmer color.
Thank you for your interest in this topic. I hope you find this information useful. Feel free to contact me with comments, questions, or suggestions.