Instructions for Loading and Using the Luminosity Mask Actions
Thank you for your donation toward the luminosity masks tutorial and actions. This page will describe how to load the actions into Photoshop, how to use them, and also has links to all the pages of the tutorial.
The two sets of actions for the luminosity masks were included in the email you received. The files are called "TK-LumMasks(Channels)" and "TK-LumMasks(Layers)." You should copy the files somewhere on your computer where they can easily be found, like the Desktop. You will need to relocate them when you load the actions into Photoshop as discussed below.
These actions are copyrighted as they represent "original work of authorship." You may use the masks for your personal work and enjoyment, but redistribution and/or sale of the actions is prohibited. If a friend or colleague wants a copy, please ask them to come to this site and contact me to obtain them.
There are a couple of ways to load the actions into Photoshop. The first and easiest is to open Photoshop, go to the place where you saved the two action set files, and double-click them (one at a time). Photoshop maximizes and loads the action set at the bottom of the Actions palette. Do the same for the second file. If this works, you can skip down to the text below Figure 19, which tells you how to run an action.
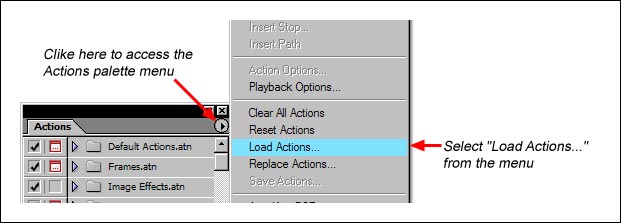
You can also load the actions "manually" while working in Photoshop. To do this, click the area on the right side of the Actions tab to access the Actions palette menu (Figure 19). From the menu, click "Load actions..." A dialog box will appear. Find the actions file from the location where you saved it. Click the file name to highlight it. Then click "Load" in the dialog box to load the actions into Photoshop's Actions palette. You will need to perform this procedure twice to load both sets of actions into Photoshop.
Figure 19
|
To run an action, simply highlight the action's name in the Actions palette and click the Play Action button at the bottom of the palette (Figure 20).
Figure 20

|
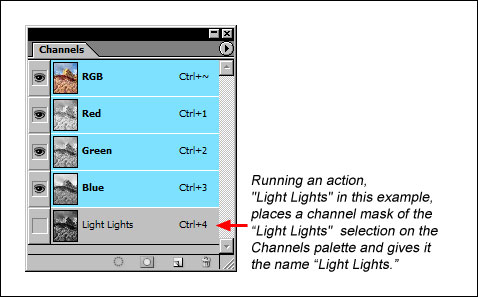
Each action in the set called "TK-LumMasks(Channels)" creates the specified mask in the Channels palette and gives it the appropriate name (Figure 21). If you plan on using the mask as a selection immediately, type Ctrl+Z to load the mask once the action has finished running. This works because Deselect is the last step in each action and Ctrl+Z will undo that step and reload the selection. Ctrl+Z only works immediately after the action finishes running. Other times, to load a mask as a selection, you will need to follow the directions in the Using the "Lights" Mask section of the tutorial.
Figure 21
|
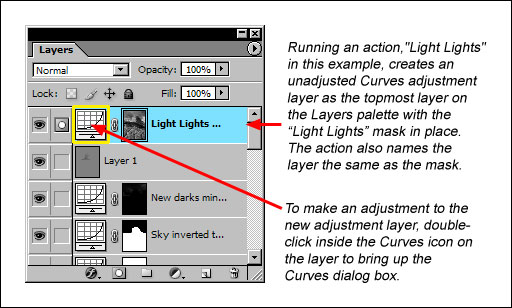
Each action in the set called "TK-LumMasks(Layers)" creates a Curves adjustment layer with the mask in place as the topmost layer (Figure 22). While the action creates an adjustment layer, it does so with no adjustment. To make an adjustment, simply double-click the Curves icon on the layer to bring up the dialog box. Having the action create an adjustment layers provides a slightly quicker method for making adjustments using the masks provided you have an idea which mask you want to use. If you do find you've chosen the wrong mask, it's easy to drag the adjustment layer to the trash and run the action for a different mask.
Figure 22
|
If you do start accumulating luminosity masks on the Channels palette for whatever reason, it's OK to delete them once you've created your adjustment layer with the mask in place. Masks on the Channels palette will increase file size. Once you're done with a mask, there's no reason to keep it unless you want to use it later in your workflow.
The actions for the masks can be run at anytime during your workflow. It is not necessary or advisable to generate all the masks at the start of your Photoshop session. Whenever you run one of the mask actions, it creates the appropriate mask based on the current composite tonal values of your image. This is ideal, because as you work on an image in Photoshop, the tonal values of the pixels naturally change. By creating a "fresh" mask only when you need it, you are assured of having a mask that correctly reflects the image's tonal values at that point in time.
I hope you find luminosity masks to be a useful and fun tool as you explore the digital darkroom and discover the possibilities within Photoshop. I would enjoy receiving feedback on this tutorial and how the masks are working for you. Please me with your comments, suggestions, and questions.
| Introduction |
| The Basic Mask—"Lights" |
| Understanding Masks |
| Using the "Lights" Mask |
| Different Masks for Different Tones |
| Experimentation is the Key |
| Getting the Actions |