 The TK Grayscale plugin offers new and unique ways to create black and white images in Photoshop.
Features
The TK Grayscale plugin works the same on Mac and Windows computers easily installs into Photoshop with a custom installer. Photoshop 2023 version 24.7.0 or later is required to install and use it. (NOTE: It is recommended to always use the latest version of Photoshop or Photoshop Beta as that is what is used for development and troubleshooting.)
How it works
The illustration below labels the plugin's different elements and describes their function.
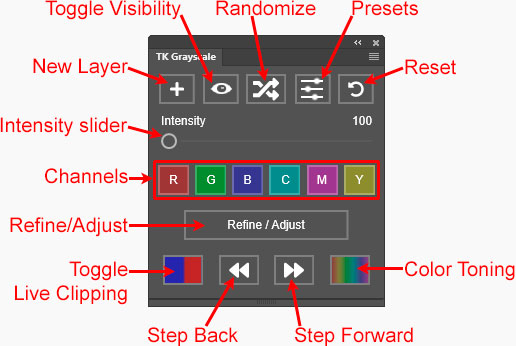
New Layer—Generates a new Black and White adjustment layer at the top of the Layers panel named "Grayscale." Right-click this button to delete the active layer if it is a "Grayscale" layer.
Toggle Visibility—Toggles the visibility of the active layer OFF and ON in order to compare the black and white conversion to the original image.
Randomize—Creates random settings for Photoshop's Black and White adjustment using the "Grayscale" layer on the Layers panel. Each click creates new random settings. Set the Intensity slider to a higher value to make the variations more visually distinct.
Presets—Opens a new user interface to load, add, and delete presets.
Reset—Resets the Grayscale plugin and the "Grayscale" layer to create a Black and White adjustment that emulates image luminosity. Right-click this button to invoke the Photoshop File > Revert command.
Intensity slider—Increasing slider values increase tonal contrast in the black and white image based on the different colors in the original image. The slider setting similarly affects the results obtained when clicking the "Randomize" button and the "Channel" buttons, i.e., more tonal contrast with higher slider values when these buttons are clicked.
Channels—These buttons create a black and white image based on the color channels (Red, Green, and Blue) or virtual color channels (Cyan, Magenta, and Yellow). NOTE: If the "Intensity" slider is set higher than 100, the results will have more tonal contrast than the actual channel.
Refine/Adjust—Opens the Photoshop Properties panel for the Black and White adjustment in order to make additional fine-tuning adjustments to the black and white image.
Toggle Live Clipping—Creates a layer at the top of the Layers panel that shows clipped highlights in red and clipped shadows in blue. Clicking the button a second time deletes the live clipping layer and turns off the live clipping preview.
Step Back/Step Forward—Steps forward or back through the Photoshop history. Makes it easy to review different variations in order to choose a favorite.
Color Toning—Creates a sepia tone for the image and opens the Hue/Saturation Properties panel so that the user can adjust the toning color and saturation.
Flyout menu
Use the plugin's flyout menu in the upper right corner to access additional options and resources.
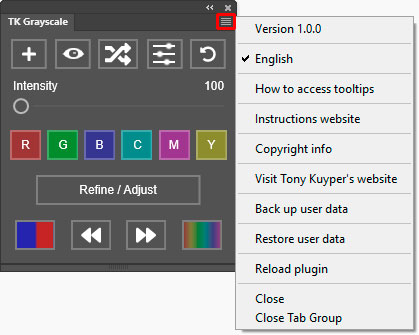
How to access tooltips—Opens a Photoshop window that describes how to access tooltips, which is to hold down "ALT" (Windows)/"option" (Mac) and move the mouse over a button or slider. The element's tooltip appears at the top or the bottom of the plugin.
Instructions website—Opens a window using the computer's default browser to this webpage.
Coypright info—Opens a Photoshop window with the plugin's copyright information.
Visit Tony Kuyper's website—Opens a window using the computer's default browser to the index page of Tony Kuyper's website.
Back up user data—Initiates the process of backing up the user's settings for the plugin.
Restore user data—Initiates the process of restoring the user's settings for the plugin provided they have been previously backed up.
Reload plugin—Provides a method to manually reload the plugin in case there are problems.
