Obtenir les scripts
Si vous avez lu ce tutoriel jusque là, vous devez avoir une meilleure idée de ce que sont les masques de luminance et de ce qu'ils peuvent faire pour vos photos. Je vous encourage à essayer les techniques développées plus haut et, qui sait, vous trouverez peut-être de nouvelles manières de traiter vos photos.
Puisque la création des masques de luminance demande de jouer quelque peu de la souris et du clavier, l'utilisation de scripts Photoshop semble être un moyen tout indiqué pour les faire. Les scripts permettent de sauvgarder une série de processus que Photoshop reproduira quand vous exécuterez le script. En quelques clics, les scripts exécuteront seuls toutes les étapes de la création des masques de luminance. C'est la façon la plus pratique et rapide de créer les masques à la volée à n'importe quel moment dans votre flux de travail. Si vous n'êtes pas habitué à utiliser les scripts Photoshop, ce tutoriel vous expliquera comment les charger et les utiliser.
Bien qu'il soit possible de construire son propre jeu de scripts à partir des explications fournies dans ce tutoriel, je mets à la disposition des photographes les scripts que j'utilise pour créer les masques de luminance. Si ce tutoriel vous a été utile, n'hésitez pas à cliquer sur le lien "Special Offers" ci-dessous pour les acheter.
| |
Le jeu de scripts téléchargeable est compatible avec toutes les versions CS de Photoshop incluant la version CS6, qu'elles soient en version MAC ou WINDOWS et 32 ou 64 bits. Toutes les explications concernant la manière de charger les scripts et de les exécuter sont incluses ainsi que des exemples de l'effet des masques.
Je mets les scripts à jour au fur et à mesure en fonction de mes expériences et des retours des autres utilisateurs. Par rapport aux descriptions données dans ce tutoriel, la version actuelle des scripts intégre les changements suivants :
- L'utilisation d'une couche alpha intermédiaire appelée "Alpha 1" a été supprimée. Puisque "Alpha 1" est le nom donné par défaut par Photoshop à tous nouveaux masques dans la palette des Couches, le fait d’éviter l’utilisation d’une de ces couches par les scripts assure un fonctionnement normal des scripts s’il existe déjà une couche "Alpha 1".
- Quelques scripts sont maintenant générés grâce à une nouvelle méthode. Bien que légèrement différents par rapport à ce qui est décrit dans le tutoriel, les masques conservent les mêmes noms et ciblent les mêmes gammes de valeurs tonales. La différence tient à ce que les masquespour les tons clairs et foncés sont maintenant plus symétriques les uns par rapport aux autres autour du point tonal médian. Cela rend un peu plus intuitif le choix d'un masque pour un réglage particulier.
- La nouvelle méthode de génération des masques a rendu possible la création de trois nouveaux masques qui ne sont pas mentionnés dans le tutoriel : Expanded Lights, Expanded Darks, and Narrow Mid-tones . Les masques "Expanded Lights" et "Expanded Darks" ajoutent un peu de tons moyens aux tons masqués respectivement par les masques "Lights" et "Darks", les étendant ainsi un peu. Le masque "Narrow Mid-tones" est semblable au masque "Basic Mid-tones", mais produit un changement moins spectaculaire avec une courbe en "S" très prononcée dans un calque de réglage Courbes (Voir la Figure 14 dans la partie "des masques différents pour des tons différents"). La meilleure façon de voir les différences entre les différents masques est d'exécuter les scripts "All Lights Masks" et "All Darks Masks" inclus dans les jeux de scripts. Les nouveaux masques augmentent les possibilités de choix de gamme tonale pour un ajustement précis. Il est facile de faire des essais pour trouver quel masque convient le mieux.
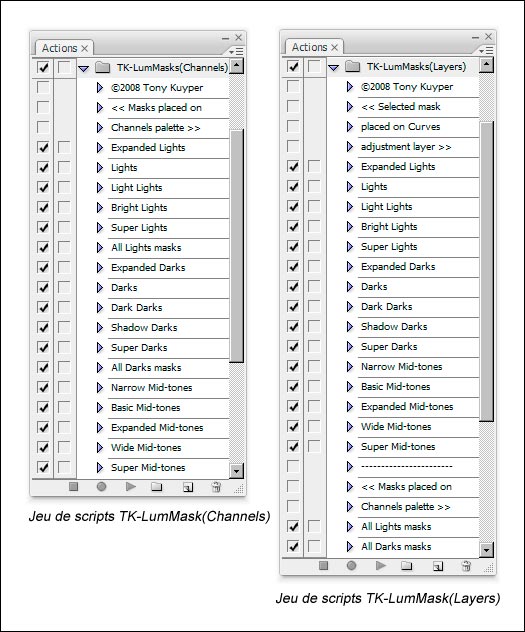
En réponse aux suggestions des utilisateurs, il y a maintenant deux jeux de scripts (Figure 18) qui sont présentés ci-dessous.
Figure 18

|
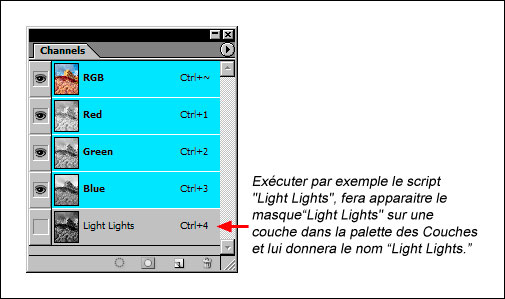
Le premier jeu, appelé "TK-LumMasks(Channels)", exécute toutes les étapes de la création de chaque masque de luminance et les place dans la palette des Couches (Figure 19). Vous n'avez plus qu'à récupérer le masque comme une sélection depuis la palette des Couches comme décrit dans la partie Utiliser le masque "Lights" de ce tutoriel et vous n'avez plus qu'à effectuer le réglage que vous souhaitez. Ce jeu de scripts vous permet d'essayer de combiner les masques en les additionnant ou en les soustrayant les uns aus autres.
Figure 19

|
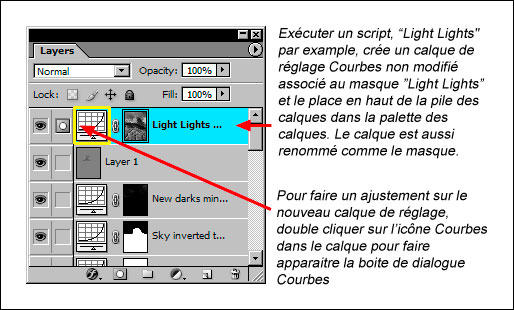
Le second jeu, appelé "TK-LumMasks(Layers)", créé en fait un calque de réglage Courbe associé au masque de luminance choisi et le place en haut de la pile des calques dans la palette des Calques (Figure 20). Quand le script a fini de s'exécuter, vous n'avez plus qu'à double cliquer sur l'icône Courbe du calque de réglage pour faire apparaître la boite de dialogue Courbe et effectuer le réglage. Souvent vous saurez vite quel est le masque dont vous avez besoin pour effectuer un réglage précis. Ce jeu de scripts permet de travailler rapidement et sans perte de temps.
Figure 20

|
Vous trouverez ci-dessous des commentaires de photographes, qui ont relu ce tutoriel et utilisés les masques, issus de blogs, newsletters, fils de discussion et de ma correspondance personnelle :
- "Your actions are transforming the world of landscape photography! The saturation and luminosity masks have become critical steps in my processing." Michael Anderson via personal correspondence.
- "Thanks so much! Of your work, I use the Channels Lum Masks almost routinely. They are a tremendous help. I probably use the highlight masks the least and the shadow mask the most. I also want to thank you for the distribution format you have developed. I really like the balance of high-quality information and instruction that is straightforward, of great interest and value to me, is NOT overproduced, and is priced so that the buy decision is easy. I certainly have paid a lot more for software that I have ultimately found of little value to me." Eric Vogel via personal correspondence.
- "I just discovered your luminosity mask method via a link mentioned within a post on lighting essentials... I've been playing with it as explained in the tutorial as I waited for the actions and WOW... I'm floored. I am a graphic designer by trade, a serious photo hobbyist and a photography blogger, and consider myself very well versed in Photoshop, Lightroom and photo retouching in general... but this method is a game-changer for me. I've only retouched a couple images so far using it and I'm realizing that it has just completely changed the way I look at retouching. THANK YOU!!!" Ryan Goodman via personal correspondence.
- "I was curious if your actions will work in Photoshop CS4? I'm looking at upgrading Photoshop and I can't live without your Luminosity masks." Adam Schallau via personal correspondence. (Yes, the Luminosity Masks actions work in CS4.)
- "I absolutely love the Lum Masks. I appreciate the work that went into them and all I can say is I simply won't process an image without them now." Don Giannatti via personal correspondence. Don's online tutorial describes how he uses the Luminosity Masks in his workflow.
- "I think that what was going on for me in the past was that I was spending so much energy just trying to create the masks and not feeling certain that I did 'em right. With your actions, I played them, and then I was able to use them with more confidence and I wasn't confusing the creation of the masks with their use. It was wonderful to see more details in the highlights and shadows after using your masks!" Tim Mulholland via personal correspondence.
- "Great information and thanks for sharing. I've been using these manually for a while and decided your actions looked like a great time saver and would be worth a donation. I know you have a lot of time invested in making them." James Quantz, Jr. via personal correspondence.
- "BTW, after weeks of having your actions, I think the masks are Brilliant!!!" Ferrell McCollough via personal correspondence.
- "Tony, I've been meaning to tell you.....those luminosity masks have become an integral part of my workflow on virtually every image. Well done." Kirk Gittings via personal correspondence.
- "Tony Kuyper has created a fantastic tutorial on generating and using luminosity masks in Photoshop. For any of you who ever need to make changes to just a part of an image (and who hasn’t), these masks make it a lot easier and a lot more effective." Rod Barbee Photography
- "Ever since I read Tony Kuyper's tutorial on luminosity masking, I have a really hard time staying away from them, particularly for landscape shots with a lot of tonal range. Tony offers some actions at the end of his tutorial that makes what sounds complicated very simple. It can become very tempting to constantly want to fiddle when you have this much power so easily over an image." Graf Nature Photography
- "The tutorial explains the utility and basics of luminosity masking far better than I could in a single post. The uniqueness of this particular tutorial is the included set of downloadable actions with instructions for their use. More importantly, the actions allow one to easily generate not only a standard luminosity mask, but also masks that are ‘ultra-directed’ to the brightest highlights, the darkest shadows and everything in between. This allows one to generate luminosity based selections that are automatically feathered and which allow fine control over the entire tonal range of an image. I plan to use the actions frequently. I think they are a real find." Howard Grill Blogspot
- "For a thorough discussion of luminosity masking – and to see some beautiful landscape images of the Colorado Plateau area – check out Tony Kuyper’s web site. Tony has a great tutorial and offers a number of masking actions which you can download for a small donation. I highly recommend you visit this site." John Shaw from his recently published eBOOK.
- Ron Niebrugge is an excellent and prolific nature photographer. His website is evidence that there are beautiful pictures everywhere. He has written a review of the luminosity masks for his Photo Blog. There is also a second entry in the blog on using the masks to facilitate HDR in Photoshop.
- "While slaving over the computer (it is beginning to feel that way) I came across a few more tools I wanted to pass along for working on your images. The most impressive is the Luminosity Masks by Tony Kuyper." Jess Lee—via on-line blog.
- "I've had the pleasure of reading it before and could barely keep the secret for much longer - it's a superb article with the valuable bonus of a very useful set of actions. Thanks Tony!"
- "Tony, thanks for posting this. I've played with several photos using the technique and it's great. Something I will use routinely from here on out."
- "I have admired your wonderful work for some time now. The beautiful glow which your images possess is incredible. Rod has already said that this is one of the best Photoshop related tutorials that he has read anywhere and I wholeheartedly agree! It was beyond gracious to share your secret with us. I tried my first image last night and was able to substantially improve it. I'm sure I've only scratched the surface of its capabilities and look forward to your follow up article. I assume that it will be just as helpful for monochrome as color. I'm sure you must have considered submitting it to a print magazine or having it as a chapter in a future book. Anyway, it's a great technique, clearly explained, and expertly written. Thanks again for sharing your knowledge and techniques!"
- "Thanks very much Tony. Already have improved an image beyond what I could before using these. Am looking forward to using them more and likely reworking some images."
- "I had to read this a few times and work with it, I'm finding the midtone mask a great way to enhance the midtone contrast. This is really good stuff, Tony."
Merci d'avoir pris le temps de lire ce tutoriel. J'espère que vous l'avez trouvé utile et que vous serez aussi enthousiaste que les premières personnes qui l'ont lu. N'hésitez pas à (en Anglais uniquement) Pour me faire part de vos remarques, suggestions et questions. J'ai ajouté des indications concernant d'autres techniques Photoshop très utiles. Merci d'aller voir l'index des tutoriels pour voir la liste exhaustive.