Painted Masks
©2011 Tony Kuyper
Luminosity painting is one of my favorite Photoshop techniques. It is a method for burning (darkening) and dodging (lightening) specific areas of an image and specific tones in those areas by painting through luminosity selections. The canvas for luminosity painting is a special Burn/Dodge layer set to Soft Light blending mode and filled with 50% gray. Black paint darkens and white paint lightens areas below where it is applied to this canvas, and the luminosity selections direct the paint to pixels of specific tones. The self-feathering nature of the luminosity selections blends the painting seamlessly into the rest of the image.
While luminosity painting can be very useful for burning and dodging an image to balance uneven dark and light tones, the concept of painting through a luminosity selection has other applications that are equally practical. Painting a layer mask for an adjustment layer is a good example. It provides a method to first make a global adjustment using an adjustment layer and then very precisely restricting the adjustment to specific areas and specific tones in the image.
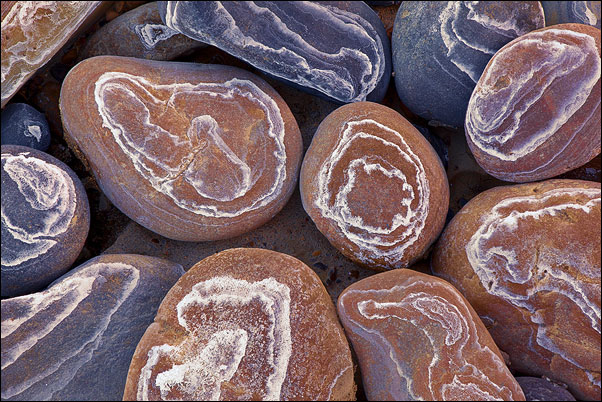
The image below shows the final version of an image where an adjustment layer with a painted luminosity mask played an important role in developing it. The mouse rollover is the image with this adjustment layer's visibility turned off. Luminosity painting provided a subtle but very important improvement to this image.

Essentially what is happening is that an adjustment layer is affecting the image (darkening it), but only in specific tones and in specific areas. All similar tones are not equally affected, as would be expected with a specific luminosity mask serving as a layer mask for the adjustment. In fact, no single luminosity mask is able to mask the adjustment with the accuracy needed for this particular image. A painted mask, however, is able to do this with relative ease. It augments a luminosity selection to over-reveal the adjustment in some parts of the image, completely conceal the adjustment in others, and even incorporates parts of two different luminosity selections into the same painted mask. In this way, painted masks make luminosity selections even more versatile, allowing greater customization depending on what the image needs.
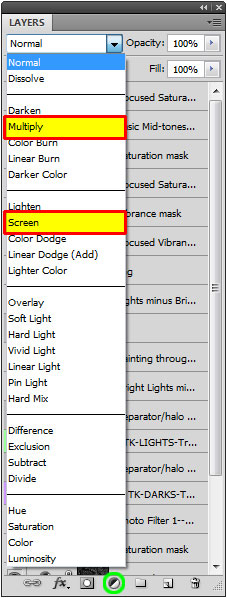
Because luminosity masks are often used to adjust the tonal values in an image, a good way to approach mask painting with luminosity selections is to start with a global adjustment that either makes the image lighter or darker, or changes its contrast. This could be accomplished in a variety of ways, such as using a Curves or Levels adjustment layer, but another useful option is to simply change the blending mode of the layer to either Screen or Multiply. Multiply blending mode will be used for the example in this tutorial, but a variety of different adjustment layers or blending mode changes could potentially be used to make the initial adjustment.
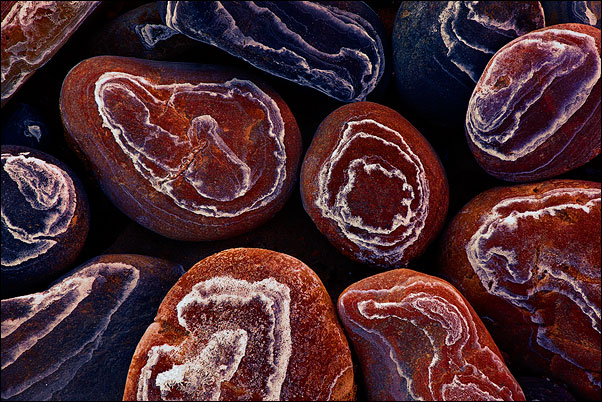
Multiply blending mode is like placing two identical transparencies in register on a light box. Even though each may be properly exposed, stacking one on top of the other makes the image look much darker, as if it were noticeably underexposed. In a similar way, Multiply blending mode darkens an image except that pure white (255,255,255) and pure black (0,0,0) are unchanged. Below is an example image with a Curves adjustment layer set to Multiply blending mode. Notice how the dark areas of the image get really dark, but how the white areas retain their highlight quality.
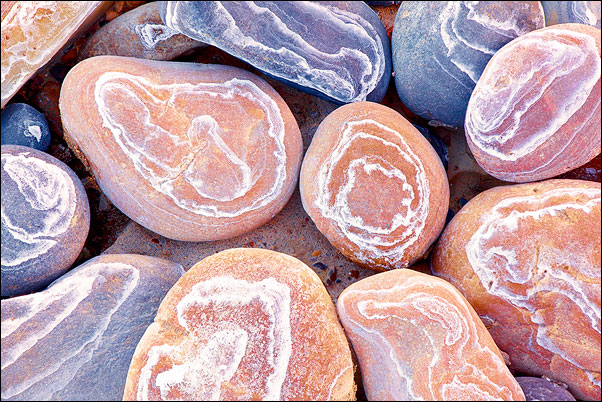
Screen blending mode does the opposite. It lightens the image and makes it look overexposed. Continuing with the transparency analogy, it's like projecting two identical transparencies onto the same screen in register from different projectors. Even though the individual transparencies may be properly exposed, the dual light sources make the projected image look overexposed. Again, pure black and pure white do not change. The image below shows the example image with a Curves adjustment layer set to Screen blending mode. All but the very darkest areas of the image appear to get brighter.
While clearly excessive when not moderated by a mask or decreased layer opacity, Screen and Multiply blending modes tend to make very natural looking tonal changes to the image when properly applied. Provided that they are used in moderation, these blending modes can subtly and appropriately change image tones without unexpected saturation or contrast changes that sometimes accompany Curves and Levels adjustments.
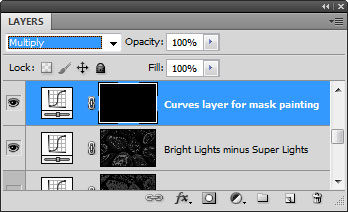
The blending mode is located in the upper left of the Layers panel as shown in the figure below. Clicking the box opens the drop-down menu of various blending modes. Blending modes make it possible to have an adjustment layer change the image, sometimes quite substantially, without making any changes in the Properties panel dialog box, e.g. no curve bending needed for a Curves adjustment layer. So to either lighten or darken an image in preparation for luminosity painting the layer mask, it's only necessary to create an adjustment layer—Curves or Levels work well—and then change the layer's blending mode to Screen to lighten the image or Multiply to darken it. No change in the Properties panel is needed.
So the first thing to do is to create a new adjustment layer. One way to do this is to click the Yin-Yang symbol at the bottom of the Layers panel (green circle, image above) and select either Curves or Layers from the pop-up menu. By default, this method creates a white, reveal-all layer mask on the adjustment layer. Then change the blending mode to either Screen or Multiply, depending on what's desired for the image. Multiply blending mode was used for this image.
Remembering that white reveals and black conceals for layer masks, once the blending mode is changed, the full force of the change will be apparent in the image because the pure white mask conceals nothing. While the chosen blending mode might benefit parts of the image eventually, this full-on change is not desired. To return the image to its original state before this adjustment layer was added, simply type CTRL+I (Mac: command+I) to invert the layer mask from white to black. This completely hides the adjustment from the image as show in the figure below. The menu command Image > Adjustments > Invert can also be used to do this.
NOTE: Another way to create the desired adjustment layer is to use the menu command Layer > New Adjustment Layer > Curves (or Levels). With this method, the blending mode can actually be chosen from the dialog box that pops up. The layer mask will still need to be inverted from white to black after the layer is created.
Once the desired (but exaggerated) adjustment is created and concealed, it's necessary to create a luminosity selection to paint through to reveal the concealed adjustment just where it's needed in the image. The easiest way to get the right selection to paint through is to make different luminosity masks (the TKAction panel makes this easy) and choose the one that is white or light gray in the tones that you want to adjust with the layer. For this image, I want to darken some of the lighter tones in the image. So one of the Lights-series luminosity mask would be ideal for targeting these tones. The figure below shows the Lights-series luminosity masks on the Channels panel, but with the newer TKActions panel for creating luminosity mask, any of these masks can be quickly generated and viewed in real-time with a single button click on the panel.
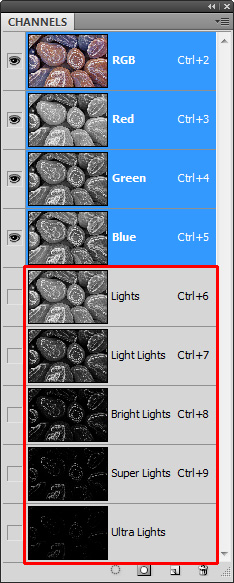
Masks are graphical representations of selections, with white and light gray showing selected pixels and dark gray and black representing pixels that aren't significantly selected. Shades of gray correspond to the degree to which pixels are selected—dark gray pixels are less selected than light gray pixels. With luminosity masks, the image itself can be seen in the masks. The mask that shows white (or light gray) in the areas that need to be changed (darkened in this case) would be a good starting point. This would be the Lights-series luminosity masks Additionally, zone masks for the light tones could also be worth considering since they can target light tones in the image while protecting the very lightest tones from graying down. For this image, a Light Lights (Lights-2) mask does a pretty good job of properly selecting the lighter tones in the image while excluding the darker tones.
Any mask can be turned into a selection using CTRL+click (Mac: command+click) on the mask's thumbnail image on the Channels panel or by using the "Selection" button on the TKActions panel.
The next step is to paint through the selection onto the black layer mask to reveal the blending-mode adjustment in the desired parts of the image. There are likely marching ants from loading the selection, and it's helpful to turn them off by typing CTRL+H (Mac: command+H) so they don't hamper judging the effect that painting has on the image. Once the selection outline is hidden, the selection will still be active and directing paint to the desired tones in the image even though the selection borders aren't visible.
Before starting to paint, single-click on the black layer mask on the adjustment layer making sure the framing brackets are around the mask. This also makes the layer active and insures that when paint is applied, it goes on the mask on the adjustment layer, where it is intended. If another layer or channel is active, the paint will go there instead, and the desired effect from painting won't be achieved.
The "color" to paint with is easy: white. The mask is 100% black, completely concealing the blending mode adjustment. To reveal the adjustment in the image, white paint needs to be applied to the mask. So make sure the foreground color is white (red square, figure below). Type "D" to reset the colors if white is not the foreground color. Typing "X" flips the colors.

Painting is done with a brush, so select the Brush tool by clicking on it on the Tools panel (yellow square, figure above) or by typing the letter "B". On the options bar at the top, adjust the hardness to 0% (yellow highlight, figure below) using the drop-down menu beside the pixel size.
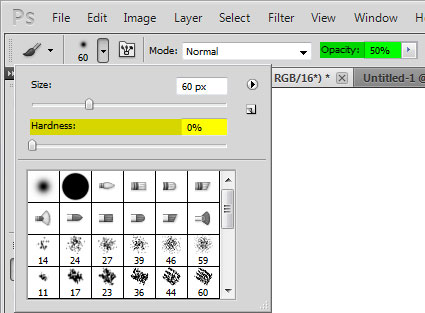
Brush size is best adjusted by placing the brush over the image and then using the "]" key (right bracket) to increase its size and the "[" key (left bracket) to decrease it. Adjust brush size to be proportional to the area that will be painted.
The opacity setting for painting (green highlight, figure above) will depend somewhat on the mask chosen to make the selection being painted through. Selections made from masks with pure or nearly pure white areas in the mask pass more paint through the selection and require a lower opacity setting to reveal the adjustment. A good starting value for opacity in this case is 10 to 20 percent. Zone masks will often be darker overall with less light gray and white areas, so a higher opacity setting is necessary to force paint through the "grayer" pixels. Starting with brush opacity at 50% is reasonable for these selections. There will always be some experimentation in mask painting, and opacity is easily reset based on what happens as paint is applied.
Now that this is all set up, it's just a matter of clicking and dragging the mouse across the image in the areas where the adjustment (darkening in this case) needs be revealed. Releasing the mouse stops the painting. Because the adjustment layer and the mask are active, the white paint automatically deposits on the layer mask even though the image itself is visible in Photoshop's main viewing window for evaluation.
One brush stroke is usually NOT sufficient to create the desired or perfect reveal of the blending-mode adjustment. There are two alternatives. If the reveal is insufficient, additional brushstrokes can be applied. Perhaps increasing the opacity or changing the size of the brush will be necessary. However, layering in multiple brushstrokes to slowly reveal the adjustment is often desirable as long as each stroke makes a slightly visible difference. Multiple brushstrokes put additional white paint on the desired pixels on the mask, revealing the adjustment more each time.
If the reveal is too pronounced after a single brushstroke, undo it using CTRL+Z (Mac: command+Z) and then lower brush opacity, reduce brush size, or possibly load or create a new, more restrictive selection to paint through.
The goal is to sequentially add white paint to the layer mask to allow some degree of the full-on blending-mode adjustment on the adjustment layer to be revealed in the image at just the desired level in the just the areas where it's desired and in just the tones that need it. By only passing paint through selected or partially-selected pixels, the luminosity selection automatically directs the paint to just the tones that need to be adjusted. While it's necessary to use the mouse to brush those parts of the image where the adjustment is wanted, the active luminosity selection insures that less than perfect mousing keeps paint inside the desired tonal lines.
Looking at the painted mask (image below) can help to better understand what's happening with this type of luminosity painting.
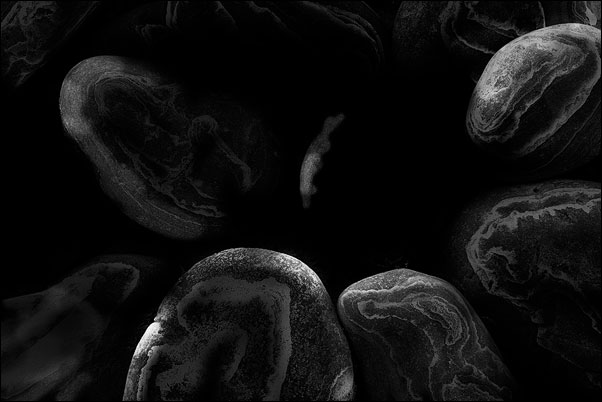
The first thing that can be seen in the mask are outlines of the image itself. Painting through a luminosity selection recreates the contours of the image during the painting process. It also helps insure that the painted areas blend perfectly with the rest of the image.
Luminosity painting works because not all pixels receive the same amount of paint. The desired tones that need to be adjusted by the adjustment layer's blending mode receive more paint, and the tones that don't need adjustment receive less or none at all. To increase the effect in certain parts of the image, apply more paint with additional brushstrokes or use a brush with a higher opacity setting. This variability in the final mask is one of the advantages of luminosity painting. Instead of being limited to the selection from a single mask, the mask can be enhanced in any area by simply applying more white paint through the selection. The enhancement can continue until the area being painted is 100% white, which constitutes complete reveal of the adjustment layer's adjustment. It's up to the photographer controlling the mouse to determine which areas receive paint and how much. The painted mask clearly shows that differing amounts of paint were applied to different areas. Some areas are very white to reveal more of the blending-mode adjustment, some are completely black where no painting occurred at all, and some areas show various levels of gray indicating partial reveal of the layer's adjustment.
This painted mask is actually the result of painting through two different luminosity selections, and it points out another advantage of this technique: It's possible to paint through any number of selections to create the desired reveal of the layer's adjustment. This is like using several luminosity masks on one layer and choosing which parts of them and to what degree they will benefit the image. In this case, most of the painting was done through the Light Lights (Lights-2) selection described above, but when repeated brushstrokes started to reveal darkening in some adjacent areas where darkening was not desired, a Bright Lights (Lights-3) selection was created that excluded even more mid-tones. This new mask better restricted the reveal of the adjustment to even lighter tones in the image. This can easily be seen in the mask with some areas adjacent to the whitest tones in the mask still remaining completely black, appropriately showing no change in the image rollover.
The image below again shows the final image with the rollover being the orignial image. Once you have a feel for luminosity painting, using it to create or enhance layer masks becomes a logical next step. Painting through a pixel-based selection, like one created from a luminosity mask, applies paint in proportion to the selection in the original mask. What is revealed or concealed by the painting blends perfectly into the rest of the image. Very precise masks are possible using this procedure. Selections from multiple pixel-based masks can be used, and they can be painted to any level between pure black and pure white to make the perfect reveal of the underlying adjustment. The effects can be subtle or significant; it all depends on where the light wants to go and where you want to take it.