Special Layer/Special Colors
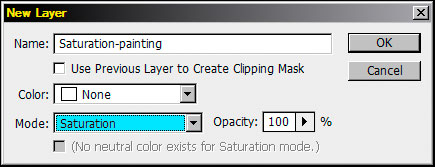
Just like with luminosity painting, saturation painting requires a special layer to work. In this case it's an empty pixel containing layer with the blending mode changed from Normal to Saturation. To make it, use the menu command Layer > New Layer. When the dialog box opens, use the drop-down menu to change the blending mode to Saturation (Figure 2). You can also give the layer a new name ("Saturation-painting" for example) if you choose. It's usually best to put this new layer at the top of the layer stack, so if it's not there, drag and drop it to the top.
Figure 2

|
The Saturation blending mode is very important here. Photoshop defines the Saturation blending mode as creating "a result color with the luminance and hue of the base color and saturation of the blend color." In other words, anything painted on this layer will have the color (hue) and brightness (luminance) of the original image. The "blend color" will be the color of paint painted on this layer, and it's only the saturation of this blend color that gets transmitted to the image. A saturated color painted on this layer will increase the saturation of the underlying color. Painting an unsaturated color will decrease it.
This layer can obviously then be very useful then for controlling saturation, increasing it or decreasing it, in specific parts of the image. By painting just those areas where a change in color saturation is desired with an appropriately saturated (or unsaturated) color, the underlying saturation of just that area is affected. A photographer using the mouse can easily add or remove saturation exactly where they want on their image.
Now what about the special colors? For saturation painting, only two are need—a very saturated color—red, for example—and a totally unsaturated color—gray. Painting a saturated color on this layer, like 100% red (RGB=255,0,0), will increase the saturation of the color under the paint. Painting an unsaturated color, like gray (RGB=128,128,128), will decrease the saturation. The colors themselves, red and gray, will not show up in the image since the layer's Saturation blending mode insures that only these colors' saturation affects the original colors in the image underneath the layer. While any color can be painted on this layer, sticking with one saturated color and one unsaturated colors helps to keep things simple for saturation painting.
Below is a link to a downloadable Photoshop action that creates the saturation painting setup. It puts a blank layer with Saturation blending mode at the top of the layer stack and makes the foreground color 100% red (RGB=255,0,0) and the background color gray (RBG=128,128,128). You may download it, load it into Photoshop's Action palette/panel, and run it to complete these steps.
|
Saturation-painting layer action |
| PREVIOUS—Introduction |
| YOU ARE HERE—Special Layer/Special Colors |
| NEXT—Incorporating the Masks |
| Saturation Painting Example |
| Summary |