Saturation Painting
©2010 Tony Kuyper
Introduction
Luminosity painting has for several years been a favorite technique for balancing the light in my images. It works by first selecting specific tones in the image. Black or white paint is then applied to a special burn/dodge layer through the selection so that the act of painting both selects the pixels that need adjustment while at the same time adjusting them either brighter or darker depending on the color of the paint. Luminosity masks are the key to making this technique work; they are the basis for the selections that are painted through. These specialized selections not only restrict the paint to the appropriate tones in the image which need adjustment, but they also feather the painting into the surrounding pixels so that the painted adjustment blends perfectly into the image.
Saturation painting takes the luminosity painting technique and applies it to saturation instead of luminosity. So in place of lightening and darkening the tones in an image, saturation painting either increases or decreases color saturation. The effect of saturation painting isn't usually as dramatic as that achieved with luminosity painting since our eyes aren't as sensitive to saturation changes as they are to tonal changes. However, just like luminosity painting, saturation painting can bring the appropriate saturation balance to an image and thereby improve its overall look. This tutorial will explain how this is done.
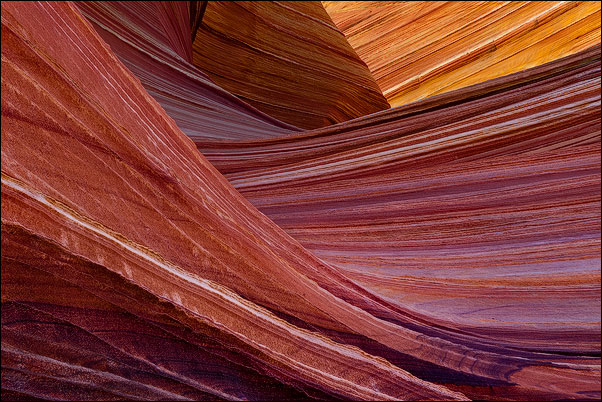
Saturation painting played an important role in Figure 1 below. The final image is presented. Rolling the mouse over the image shows how it looks with the saturation painting layer turned off. The area where the saturation painting is most obvious is the yellow trapezoid in the upper right of the image. By significantly increasing the saturation of this area, its overall saturation more closely resembles that in the rest of the image. There are other more subtle saturation changes in the image that become apparent on closer inspection. The colors on the left side have been slightly desaturated compared to those in the rollover. Also, some of the colors in the center and on the right have had their saturation slightly increased, but not nearly as much as in the yellow trapezoid. So by selectively choosing which areas get painted, saturation was easily increased or decreased to whatever to the degree I felt was appropriate for this image.
Figure 1

|
In this way, saturation painting can be very helpful when developing an image in Photoshop. Adjustment layers can sometimes change image saturation in an uneven manner. Additionally, saturation sometimes only needs to be added to or subtracted from specific parts of an image and not others. Saturation painting provides a way to restore the image's overall saturation balance and to add and subtract saturation in a highly controlled manner to specific parts of the image. And, conveniently, all these saturation changes can be done on a single layer in Photoshop.
Saturation masks are the key to successful saturation painting. Unlike luminosity painting which has many masks, there are only two masks needed for saturation painting—the Saturation mask and the Vibrance mask. The tutorial on saturation masks describes how these are made.
| YOU ARE HERE—Introduction |
| NEXT—Special Layer/Special Colors |
| Incorporating the Masks |
| Saturation Painting Example |
| Summary |