 The TK Selection Brush is a Photoshop plugin that acts like a Photoshop tool. It allows selections to be created and edited simply by painting on the image with the Photoshop Brush and Eraser tools. It's a unique application that opens new opportunities and speeds the workflow. Jump to the download section.
Features include:
NOTE: This plugin and the installation document are English-only and have not been translated into other languages.
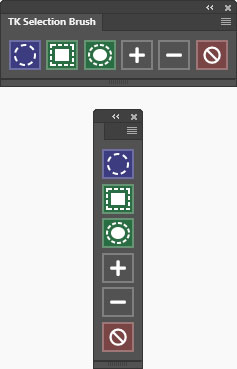
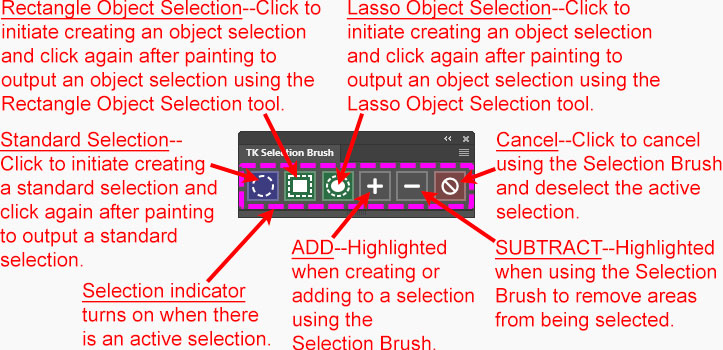
The image below describes the plugin's buttons.
The plugin is easy to use.
The videos below by Dave Kelly and Sean Bagshaw show how to use the plugin. Scroll down to the "Tips and Best Practices" section for even more information.
The fly-out menu in the upper right corner provides access to the plugin's preferences and additional resources.
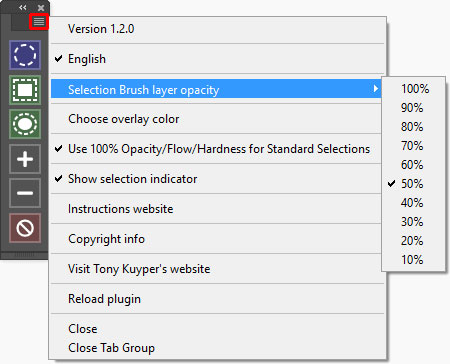
1. Use the "Selection Brush layer opacity" setting in the preferences (shown above) to choose how dense the paint looks when it is applied to create selections. "50%" is the default. Using values less than 100% makes it easier to see the image when applying the paint to better determine where to apply it.
2. When Rectangle or Lasso Object Selection is chosen as the type of selection, the plugin automatically sets the Brush's Opacity, Flow, and Hardness to 100% for best results. The same is true for Standard Selections if this option is enabled in the preferences (which it is by default). When the painted area is eventually output as a selection, the plugin returns Opacity, Flow, and Hardness to what they were previously set to by the user.
3. For Standard Selections only, the Brush's Opacity determines the degree of selection of the painted area. The amount of paint deposited when painting with the Selection Brush matches the degree to which the painted area will be selected. So, to make an area 100% selected, paint with a Brush Opacity of 100%. To make a 50% selection, use a Brush Opacity of 50%. Partial selections (those less than 100%) are useful for partially revealing an adjustment. They can also be useful for helping generative fill content blend better into the image. NOTE: Brush Opacity should always be set to 100% for making Object Selections.
4. For Standard Selections only, Hardness of the Brush tool determines feathering. To make a selection with no feathering, set Brush Hardness to 100%. As the Hardness percentage decreases, the feathering for the selection increases. NOTE: Brush Hardness should always be set to 100% for making Object Selections.
5. While making a Standard Selection, clicking the SUBTRACT button changes the Brush tool to the Eraser tool. This allows removing (erasing) some areas from being selected. If too much has been erased, clicking the ADD button changes back to the Brush tool to paint in additional areas that need to be selected.
6. When planning to use the Rectangle Object Selection option, it is not necessary to paint all the way around the object to be selected. Two dabs of paint in the diagonal corners of the rectangle that defines the object to be selected are all that's needed. Some users prefer to place dabs of paint on several outer parts of the object to be selected. This works too for Rectangle object selections.
7. When planning to use the Lasso Object Selection option, it is frequently possible to use the Selection Brush to make a loose outline around the object and then click the Lasso Output Selection button again to select it. However, if this doesn't properly select the object, click the "Cancel" button to start over, painting over the object entirely with the Selection Brush the next time instead of making a loose outline around it. Completely painting over an object is the surest way to properly define it for selection with the Lasso object selection output option.
8. Photoshop's Object Selection tool only allows selecting one object at a time. Because of this limitation, the Rectangle and Lasso Object Selection options (which use the Photoshop tool) canNOT select multiple objects at the same time either. So, when using the Selection Brush to select an object, select only one object at a time and then output the selection using the Rectangle and Lasso Object Selection buttons. To select additional objects, click either the Rectangle and Lasso Object Selection buttons to initiate the process. This saves the current selected area in memory. Then paint in the next object that needs to be selected. Now, when the newly painted object is output as a selection using the highlighted Rectangle or Lasso Object Selection buttons, the saved selected area will automatically be added back as part of the active selection.
9. Objects can be REMOVED from a selection in a similar way. First choose the Rectangle or Lasso Object Selection option by clicking the corresponding button. This saves the current active selection in memory. Then click the SUBTRACT button. This indicates to the plugin that the object defined by the painted area should be SUBTRACTED FROM THE SELECTION. Then paint on the image to define the object to be removed. Finally click the highlighted button to output the painted area as an object, and the new selection will have this object subtracted from the saved selection.
10. Since the Selection Brush uses Photoshop's Brush tool, the "click-SHIFT-click" method to create straight-line brushstrokes works for it. This means it's possible to make straight-line Standard Selections or to quickly create Object Selections of straight-line objects.
11. While magenta is the default color for painting with the Selection Brush, "Choose overlay color" in the preferences allows choosing a different color. NOTE: Saturated colors work best for visualizing areas painted with the Selection Brush.
12. The horizontal orientation of the TK Selection Brush plugin is the same width as several other "TK" plugins, so it fits nicely in the same panel dock with them. This also means it can be docked as a tab with other "TK" panels so it to be easily opened when needed by clicking its tab.
13. To change the plugin's size and/or orientation, hover the mouse over an edge to get the double-arrow cursor, grab the edge (click down on the mouse and hold), and then drag the edge to create the desired size/orientation.
The plugin is distributed in a download folder which includes installation directions (it's easy to install). Photoshop 2022 (version 23.3.0) or Photoshop Beta is required to install it, but testing and troubleshooting are only available for the latest version of Photoshop. To get the free TK Selection Brush plugin, follow the directions below.
