Different Masks for Different Tones
The self-feathering feature of the luminosity masks makes them incredibly useful. It's like making the perfect selection each and every time with no effort at all. No zooming-in to make sure all the necessary pixels are included in the selection and no need to go back and touch up the edges of selections after the adjustment is made. The luminosity mask takes care of all that. In addition, the "Lights" mask is only the starting point for the different types of luminosity masks that can be created. The "Lights" mask is useful if you want to adjust the light areas of the image, but the shadows and mid-tones frequently need adjustment too. From the basic "Lights" luminosity mask, a large number of additional masks can be generated that target these other brightness levels in the image. I'll list them below and describe how they are made. Using this information you should be able to make a series of Photoshop actions to create the various masks. Information on how to obtain a set of actions for all the luminosity masks is available on the last page of the tutorial. With an action set, you simply need to run the action for a particular mask and it's ready to use.
I've chosen a different image to illustrate the various luminosity masks, one that is less abstract and therefore easier to see the features in the masks. As you look at the various masks, you will always see a grayscale outline of the original image. Selections from these masks, as a result, will have the perfect tonal gradation so that adjustments made using the masks will blend in seamlessly.
Figure 11 shows the four masks that target the bright areas of the image:
- "Lights"
- "Light Lights"
- "Bright Lights"
- "Super Lights"
They are created by progressively intersecting selections of the same mask. Intersection is when Photoshop creates a new selection by finding the pixels that two selections have in common. To use it, load a mask as a selection as described in Figure 7 in the Using the "Lights" Mask section. Once the ants are marching, Shift-Alt-Ctrl+click on the same mask to do the intersection operation. In this way, the "Light Lights" selection comes from intersecting the "Lights" mask with itself. To make a mask of this new selection, the "Light Lights" mask, click the square-with-a-circle-in-it icon at the bottom of the Channels panel, and then name it "Light Lights." The next mask, the "Bright Lights" mask, comes from intersecting the "Light Lights" mask with itself, and so on. Each mask gradually narrows the pixels selected to brighter and brighter areas of the image. Check the "Super Lights" mask in Figure 11. Dark values in the mask are essentially black. Details can only be seen in the lightest values of the image, so only the very lightest areas will be affected on an adjustment layer with this mask in place. Still, the light areas of the image can be seen as a grayscale positive in the mask which tells you that the selection generated from this mask will be perfectly feathered for whatever adjustments are made using it. (NOTE: In the latest version of the actions to create the luminosity masks, an "Ultra Lights" mask has been added. It's created by intersecting the Super Lights selection with itself. The resulting selection selects the only very brightest tones in the image.)
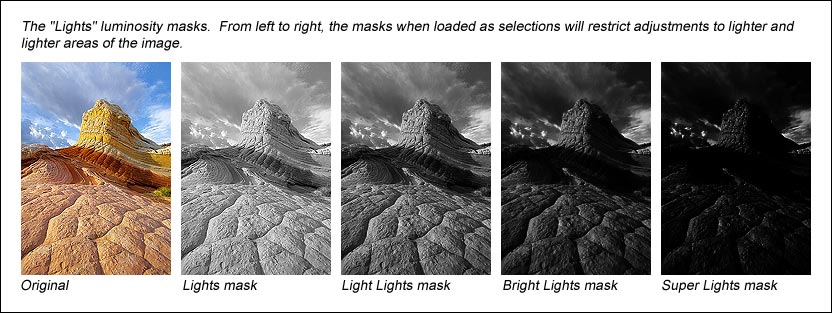
While the "Lights" mask would seem like a good one to use in adjusting the light areas of the image, "Light Lights" and "Bright Lights" often work better. There is a lot of gray in the dark values of the "Lights" mask, so adjustments through this mask significantly bleed into the image's dark values. The "Light Lights" and "Bright Lights" frequently do a better job of isolating the adjustment to just the light values since the dark values of the image are darker gray or even black in these masks.
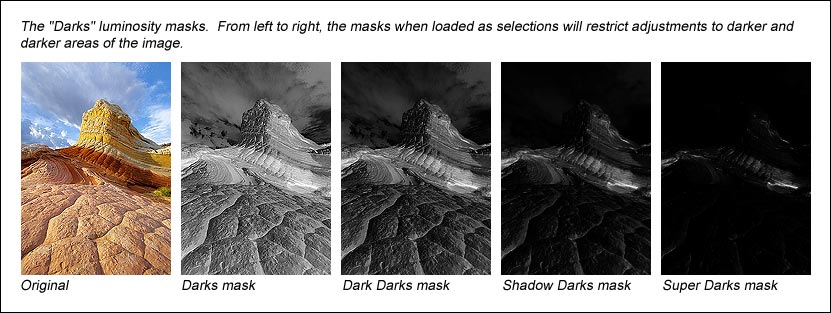
Now for the darks. The primary "Darks" mask is simply the inverse of the "Lights" mask (Shift-Ctrl+I after loading the "Lights" mask as a selection). Then once again progressively intersect the masks with themselves to create narrower and narrower selections of the dark areas of the image. The resulting masks are called:
- "Darks"
- "Dark Darks"
- "Shadow Darks"
- "Super Darks"
Since the "Darks" luminosity mask is the inverse of the "Lights" mask, these are all negatives of the image. Each progressively restricts the selection to darker and darker image pixels (Figure 12). In the mask for the "Super Darks", bright areas in the image are essentially black meaning they'll remain unaffected by any adjustment applied using the mask. In a manner similar to the masks for the light areas, "Dark Darks" and "Shadow Darks" often work best for isolating adjustments to the dark values in the image. (NOTE: The latest version of the actions to create the luminosity masks also contains an "Ultra Darks" mask, created by intersecting the Super Darks selection with itself. The resulting selection selects the only very darkest tones in the image.)
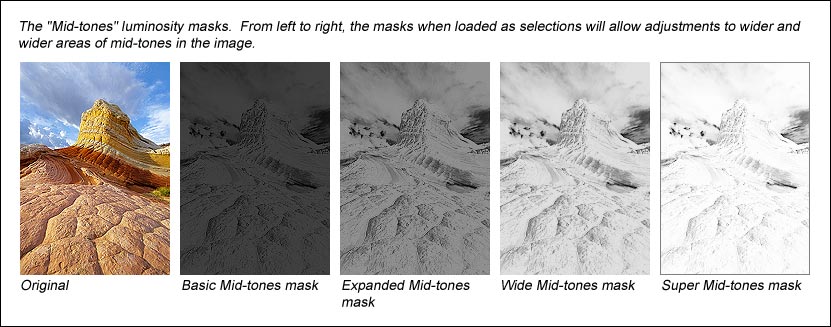
The mid-tones are a little trickier to get at, but lead to some very useful masks. You have to first select the entire image (Ctrl+A) and then subtract off one light and one dark mask. Subtraction is accomplished by an Alt-Ctrl+click on whatever mask you want to subtract. When you remove the light and dark tones of an image, you're left with mid-tones. For the masks included in the downloadable actions, I've chosen to progressively subtract the masks in the order they're listed above. Here are the mid-tone masks:
- "Basic Mid-Tones" = "Lights" and "Darks" subtracted from the entire image
- "Expanded Mid-tones" = "Light Lights" and "Dark Darks" subtracted from the entire image
- "Wide Mid-tones" = "Bright Lights" and "Shadow Darks" subtracted from the entire image
- "Super Mid-tones" = "Super Lights" and "Super Darks" subtracted from the entire image
Figure 13 shows that the masks for the mid-tones get progressively lighter as more and more pixels are included in what the selection defines as a mid-tone. You could obviously choose a variety of ways to make a mid-tones mask since there are four each of the dark and light masks to choose for subtraction. The ones listed here are a good starting point. To target different tones, you can always subtract or add (Shift-Ctrl+click) additional dark and light masks to the initial mid-tones selection. My experience is that the "Basic Mid-tones" and "Expanded Mid-tones" masks work well for most mid-tones adjustments. The "Wide" and "Super Mid-tones" can be useful when creatively combining masks. (NOTE: The newly added "Ultra Lights" and "Ultra Darks" selections also make possible an "Ultra Mid-tones" selection. It's created by first selecting the entire image, and then subtracting the Ultra Lights and the Ultra Darks. However, because the tonal range of the Ultra Lights and Ultra Darks is so narrow, the tonal range of the Ultra Mid-tones is so broad that its usefulness in making targeted tonal adjustments is limited. For combining masks, the Ultra Lights and Ultra Darks work best for making "subtracted masks" which are explained elsewhere in the tutorials.)
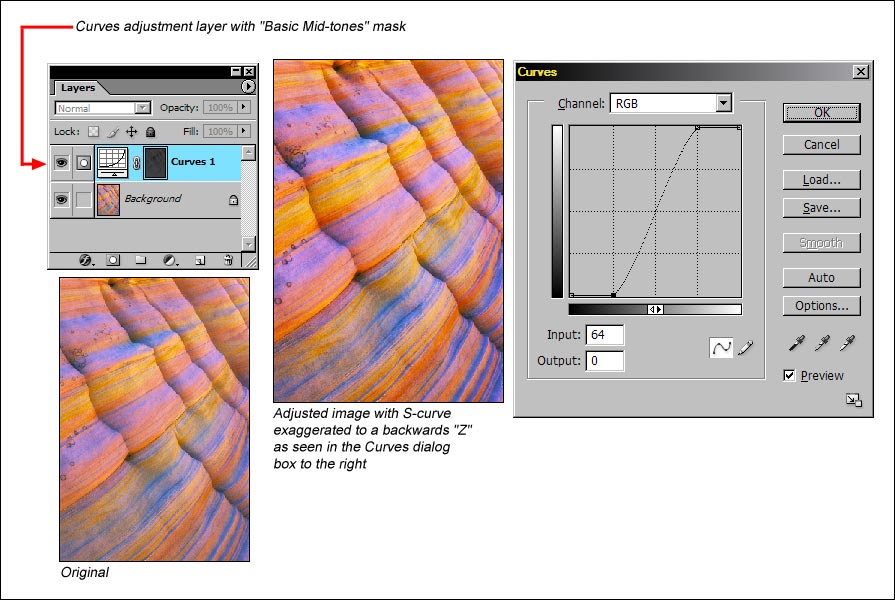
The "Basic Mid-tones" mask is one of my favorite luminosity masks. Depending on the image, the mask for it will appear nearly black or very dark. It takes an extremely steep S-curve in the Curves dialog box applied through this mask to create a noticeable change in the image. In fact, you can pull the quarter tone values to their respective bottom and top positions, essentially making the S-curve a backwards Z-curve, with only a small change to the image. But what a beautiful change it is! For the right image, this adjustment is similar to taking the picture with Velvia. It's often provides the perfect pop to contrast and saturation (Figure 14).
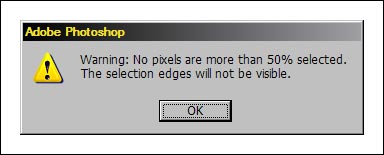
As you create luminosity masks, the dialogue box in Figure 15 may pop up. This dialog box is saying that because less than 50% of any pixel's opacity is selected, the marching ants won't appear. It does not, however, mean that there is no selection. For some luminosity masks, having only 40% or even 20% of pixel opacity selected works just fine. When you add, subtract, and intersect luminosity masks, it's quite possible to create one where no pixels are more than 50% selected. Such a mask will appear very dark gray or even black. The "Basic Mid-tones" mask is a good example. Even though there are no marching ants when the mask is loaded as a selection, adjustments through the mask will still occur and be perfectly feathered. You may need to stretch, push, or pull adjustments to the extreme to see a noticeable difference in the image, but the luminosity mask will be doing its job of properly targeting the intended tonal values. So if the dialog box shows up, just click "OK" and continue.