Luminosity Painting
Luminosity painting is a specialized form of burning and dodging. While it utilizes the Burn/Dodge layer, it does so by painting black and white through an active luminosity mask selection. The selection controls how much paint is deposited on each pixel, and, because the selection is based on an image's tonal values, painting trough a luminosity selection confines the paint to specific tones in the image. In this way, not only is image brightness controllable with luminosity painting, so is contrast. The contrast control is particularly exciting. Properly used, luminosity painting creates a contrast brush. It's possible to use it to add or remove contrast simply by painting on the Burn/Dodge layer. While adjustment layers are probably the best way to change global brightness and contrast, luminosity painting is an excellent method for managing it in specific areas of an image.
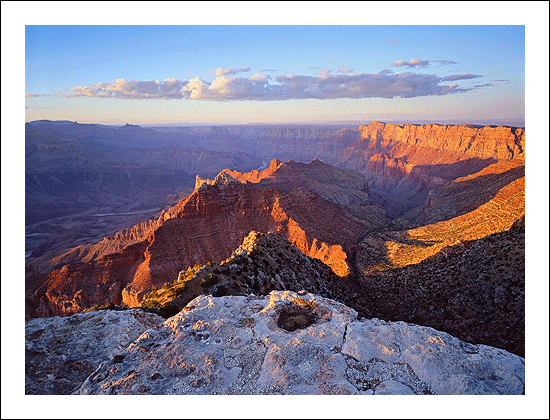
A recent image had three areas where luminosity painting was used to good effect. Figure 8 shows the final image and includes the luminosity painting. Roll the computer mouse over the image to see how it looked before luminosity painting.
Figure 8
|
Can you see the difference? The final image (no rollover) contains three areas where luminosity painting was used to improve brightness and contrast:
- The sunlit edge near the center of the foreground rim was burned darker (rollover is too light),
- The large shadow area on the right just below the rim was lightened and the details in the shadows were enhanced (rollover is too dark and lacking detail), and
- The cloud was made darker and has more contrast (rollover is lighter with less contrast).
The process for luminosity painting is as follows:
- Create a Burn/Dodge layer.
- Create the desired luminosity mask selection. The Luminosity Masks tutorial explains how to do this. It's often useful to make selections of several similar masks and save them on the Channels palette in order to experiment with which works best.
- Type Ctrl+H to hide the marching ants that define the selection. Hiding the marching ants makes it easier to see what's happening as painting occurs on the Burn/Dodge layer. It's important to understand that after typing Ctrl+H the selection is still active and is controlling how much paint gets applied to each pixel.
- Paint the appropriate color (black to burn, white to dodge) onto the Burn/Dodge layer until the desired level of brightness and contrast is achieved. The opacity of the brush may need to be set considerably higher than what is needed for regular burning and dodging. All luminosity selections will block the paint from being deposited on the Burn/Dodge layer to some degree. Higher opacity settings for the brush are often needed to force enough paint through the selection to have the desired effect. A stroke or two of the brush will provide quick visual feedback for adjusting the brush's opacity. Don't forget that it's best to build the effect gradually with multiple strokes instead of trying to paint in the effect in just one pass and be sure to use a feathered brush.
- Deselect (Ctrl+D). The absence of the marching ants can make it easy to forget that there is an active selection. After painting, deselecting turns off the hidden selection so that it won't influence subsequent steps in the workflow of the image.
A couple examples from the image will help illustrate how the process works.