Which color? Which selection?
With different luminosity selections to choose from, it's always possible to find one or more that will work. The Lights selection turned out to be a particularly effective choice for opening up the shadows. The very darkest values in the shadow area appear to have remained 50% gray on the Burn/Dodge layer in Figure 12 even when brushed with white paint several times using a 75%-opacity brush. This means they weren't lightened by the white paint and will remain unchanged in the image. This helps preserve the richness that comes from solid dark values in the shadows. The Light Lights, Bright Lights, or Super Lights selections would not have been good choices to paint through since dark pixels aren't even partially selected with these selections and it would have been nearly impossible to separate the dark tones in the shadows using them.
At first it might seem a little confusing as to whether to burn or dodge and which luminosity mask selection to paint through. To help figure it out, ask two questions. Start with "Does the area need to be lightened or darkened?" This determines which color to choose for painting. Choose white to lighten and black to darken. The second question to ask is "Does the area need more contrast or less contrast?" If it needs more contrast, choose a luminosity selection to paint through that reveals tones of the painting color, e.g. one of the "Lights" selections if painting with white. This is what was done in the example of opening up the shadows (white paint through the Lights selection increased contrast). If less contrast is need, choose a selection to paint through that conceals tones of the painting color, e.g. one of the "Lights" selections if painting with black. This is what was done in the example of darkening the highlights (black paint through the Bright Lights selection decreased contrast). The table below summarizes the different combinations, but after working it out a couple of times with actual images, the right combo is quickly obvious.
| If you want to . . . | And . . . | Paint . . . | Through a . . . |
| Increase brightness | Increase contrast | White | "Lights" selection1 |
| Increase brightness | Decrease contrast | White | "Darks" selection2 |
| Decrease brightness | Increase contrast | Black | "Darks" selection2 |
| Decrease brightness | Decrease contrast | Black | "Lights" selection1 |
2"Darks" selections – Darks, Dark Darks, Shadow Darks, Super Darks, and Ultra Darks
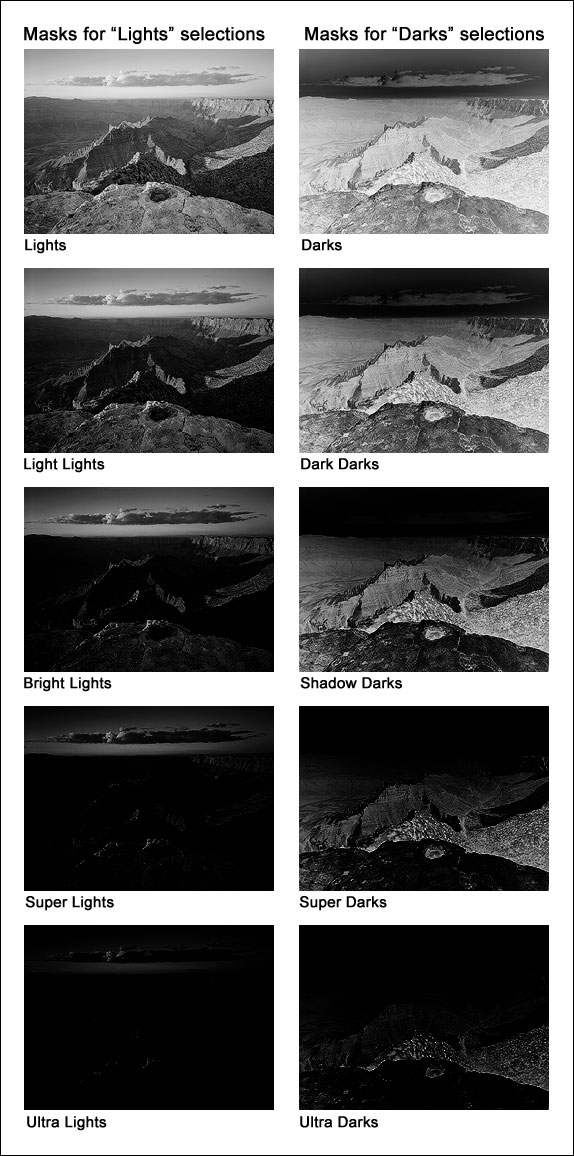
Figure 13 shows what the masks of the various selections look like in order to give an idea of how painting through a particular mask will deposit paint on the Burn/Dodge layer. The lighter the area on the mask, the more paint that will be deposited on the layer. Again, the Luminosity Masks tutorial explains how to make these different masks.
Figure 13
|
| The Burn/Dodge Layer |
| How to Use the Burn/Dodge Layer |
| Luminosity Painting |
| Darkening Highlights |
| PREVIOUS—Opening the Shadows |
| YOU ARE HERE—Which Color? Which Selection? |
| NEXT—Lessons Learned—Another Example |