Lessons Learned—Another Example
The first parts of this tutorial were written relatively soon after I understood how to use the luminosity masks to luminosity paint. With more experience, the value of luminosity painting in my workflow has increased to the point that it’s now my favorite Photoshop technique for adding creative light to an image. This section updates what I have learned, reviews important points about luminosity painting, and provides another example.
When the tutorial was written, I was only using luminosity painting to affect discrete areas of the image. Since then I’ve practiced using it more broadly. Painting is a great way to touch up small areas, but much larger regions can also brushed to good effect. The standard luminosity masks created by the actions are a good starting point for choosing a mask to paint through, but there are many ways to create and combine masks. The off-center mid-tones masks discussed in The Magic Mid-tones have provided many masks that I’ve found useful in luminosity painting. The bottom line is that it’s usually possible to tailor a mask that works well for a particular paint job. So while small, targeted adjustments are a good way to understand how luminosity painting works, there is a lot of room to grow and develop from there. Larger brushes, alternate masks, and the whole canvas are possibilities that should be considered.
In the Painting HDR tutorial, I liken painting through a luminosity mask to having a magic brush: one that can’t accidently paint outside the lines because it creates the lines while it paints. This applies to luminosity painting as well. Choose or create the right luminosity selection and only the pixels that need adjustment get painted on the Burn/Dodge layer; those that don’t are unaffected. And there’s even some flexibility in the actual mask choice. Because luminosity painting can be applied heavily, lightly, or anywhere in between, even if the chosen mask isn’t the perfect one, adjusting how much paint is applied and where it goes can overcome an imperfect mask choice to a certain degree. However, it’s always best to try and find a mask that best selects the pixels that need adjustment.
Another positive point for luminosity painting is that the luminosity masks, while very powerful, are also somewhat static. The pixels they select are not easily changed when the luminosity mask serves as a layer mask on an adjustment layer. True, there are an infinite number of possible luminosity masks, but each defines a specific set of pixels and percentages of pixels. Luminosity painting makes the luminosity masks much more dynamic. Since the mask is simply a template for how paint is applied to the Burn/Dodge layer, the pixels and pixel percentages defined by it are only the starting point for how the mask will affect the image. Painting more or less through this mask template can respectively expand or contract a particular mask’s effect, so the painter/photographer has complete control to adjust the mask to suit a particular image. This capability takes luminosity painting well beyond what can be accomplished with a static mask on a Curves adjustment layer.
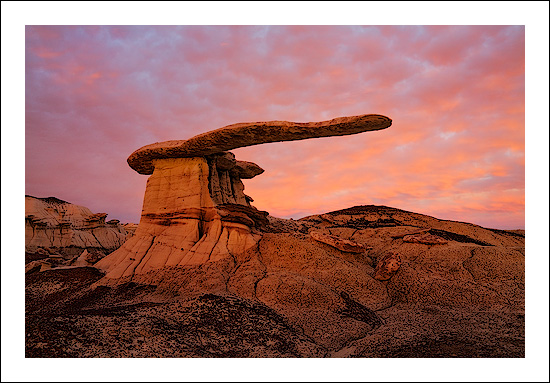
A recent image shows how luminosity painting was used to a greater degree than in the examples in the tutorial. Figure 14 shows a final image that was substantially finished using luminosity painting. Painting was used to adjust contrast and brightness to better balance the light throughout the image. The rollover shows the image without the painting, where global contrast is too high and the local contrast is too weak.
Figure 14
|
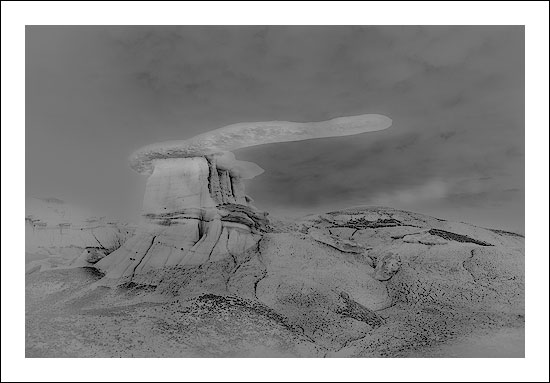
Figure 15 shows what the Burn/Dodge layer looked like for this image after it was luminosity painted. Remember, everything lighter than 50% gray lightens the tone in the image, and everything darker than 50% gray darkens it. In general, the effect of the painting in this case was to darken some tones in the sky and to lighten and improve contrast in the land and the rock formation. The ability to affect contrast is a hallmark of luminosity painting. This can best be seen in this image in the land, pedestal, and rock formation. Luminosity painting was used to lightened the lighter tones and darken the darker tones creating better separation (more contrast) throughout these areas.
Figure 15
|
Since luminosity painting was used extensively here, it’s easy to see the imprint of the image on the Burn/Dodge layer. This is the result of painting white and black through specific luminosity masks that lighten or darken the image. The fact that the image is so plainly visible indicates how effective luminosity painting is at targeting specific tones (the magic brush effect). If luminosity masks were not used to paint through, the result would simply be light and dark splotches on the Burn/Dodge layer. The brush would distinguish no texture, and all the painted pixels would be affected equally by the paint. Luminosity painting, however, paints each pixel to perfectly match its degree of selection in the luminosity mask, so a very detailed Burn/Dodge layer results and precise brightness and contrast adjustments are possible.
One of the nice things about Luminosity painting is that it’s very easy to control, even with a computer mouse, so learning the technique isn’t all that hard. Even though my first attempts at luminosity painting were somewhat tentative, it’s clearer now how to better use it to control light throughout the image. Adjustments that used to require a Curves adjustment layer with a luminosity layer mask are now painted onto the Burn/Dodge layer with greater precision. Luminosity painting places the adjustment exactly where it’s needed (by where I choose to paint), and scales the luminosity mask’s effect with surprising accuracy (by how much paint I apply through the luminosity mask selection). While luminosity masks and Curves adjustment layers are still routinely used to affect more global or more significant tonal adjustments, when it comes to fine-tuning the image and personalizing the light, luminosity painting is my technique of choice. I hope you will give it a try.
| The Burn/Dodge Layer |
| How to Use the Burn/Dodge Layer |
| Luminosity Painting |
| Darkening Highlights |
| Opening the Shadows |
| PREVIOUS—Which Color? Which Selection? |
| YOU ARE HERE—Lessons Learned—Another Example |